How to Fix CORS Errors in Your Adobe Express Add-On
If you just built your first Adobe Express add-on and wired it up to a backend API, there’s a decent chance you’ve already hit this wall. Everything works perfectly when you test your server with Postman or curl, but the moment your add-on calls it from the browser, you may see errors like these:
CORS Policy Issue : ‘Response to preflight request doesn’t pass access control check: It does not have HTTP ok status’
Access to fetch at ‘https://api.example.com/data' from origin ‘http://localhost:3000' has been blocked by CORS policy: No ‘Access-Control-Allow-Origin’ header is present on the requested resource.
Cross-Origin Request Blocked: The Same Origin Policy disallows reading the remote resource at https://api.example.com/data.
Request header field authorization is not allowed by Access-Control-Allow-Headers in preflight response.
This post walks you through exactly what CORS is, why it only shows up in the browser, and how to fix it at each stage: local development, a private link, and finally a public listing. I’ll also cover why you need a separate backend in the first place, because that part trips up a lot of people before they even get to the CORS problem.
Why Do You Even Need a Separate Backend?
First off, let’s get one thing straight: it’s not as obvious as you might think.
When you build an Adobe Express add-on, the UI part, the panel with your buttons, forms, and JavaScript, runs inside the user’s browser. That means every line of code you write there can be opened, read, and copied by anyone who knows where to look. Browser DevTools makes this trivially easy.
So here’s the problem: what if your add-on needs to call OpenAI? Or talk to a database? Or make a payment? Those operations need secret keys, API keys, database passwords, and tokens. If you put those keys inside your add-on code, they ship to the browser, and they’re exposed. Anyone can steal them.
A backend server solves this. It’s a completely separate program, a separate folder on your computer, running its own process, that sits between your add-on and the outside world. Your add-on sends a request to your backend, your backend uses the secret keys to call OpenAI or your database, and then it sends the result back to your add-on. The keys never touch the browser.
Here’s what that separation looks like in practice:
Your Computer
├── my-addon/  ← Add-on UI (runs in the browser via Adobe Express)
|    ├── src/
│    |   ├── index.html
│    |   ├── index.js
│    |   └── manifest.json
|    └── README.md
|
└── my-backend/        ← Backend server (runs on your machine or in the cloud)
    ├── server.js
    └── .env           ← Your secret keys live here, never in the add-on folder
These are two separate projects. You run them with two separate commands. The add-on calls the backend over HTTP using fetch(), and the backend does the sensitive work and returns JSON.
What CORS Really Is?
CORS stands for Cross-Origin Resource Sharing. It’s a security rule built into every browser.
Here’s the situation it’s designed for: imagine you’re logged into Gmail and then visit a shady forum. JavaScript on that forum tries to silently fetch your inbox data by making requests to Google’s servers on your behalf (using your login cookies).
Without CORS, the shady site could read your emails. With CORS, Google’s servers send headers saying “Only gmail.com can read this.” Your browser blocks shadyforum.com from accessing the response, keeping your data safe.
The way a server signals “yes, I allow this” is by including specific HTTP response headers, headers that start with Access-Control-.... If those headers are missing, or if they don't match the origin of the page making the request, the browser blocks the response. Your JavaScript never sees the data, and you get a CORS error in the console.
Two things to keep in mind:
One: curl and Postman calls don’t go through this check. CORS is a browser thing. So when your terminal says the API works fine, it’s not lying; it’s just not going through the same rule. Your add-on in the browser is a completely different story.
Two: CORS errors don’t mean your server is broken. It means your server is running fine, but isn’t sending the right permission headers back. The fix is almost always adding a few lines to your server code and not your add-on code.
How the Add-On and Backend Actually Connect
Let’s trace exactly what happens when your add-on calls your backend, step by step:
A user opens Adobe Express, and your add-on panel loads in their browser.
The user clicks a button or triggers some action, and your JavaScript runs
fetch("https://your-api.com/something", { method: "POST", ... }).The browser sends that HTTP request to your backend server.
Your server processes the request and sends back a response, some JSON probably, along with a set of HTTP headers.
The browser looks at those headers. If
Access-Control-Allow-Originis present and matches the origin of the page that made the call, the browser passes the response to your JavaScript. If it's missing or wrong, the browser throws a CORS error, and your code gets nothing.
So the add-on is the client, your server is the backend, and they talk over HTTP. CORS lives at step 5, on the browser side, checking what the server said.
One important thing about where to put your fetch() calls: In the Adobe Express add-on architecture, there are two environments, the panel UI (your index.js/App.js, the HTML/JS that renders the interface) and the document sandbox (your code.js, which handles logic related to the Express document itself).
Network calls like fetch() belong in the panel UI, not the document sandbox. The sandbox is for document operations; the UI is where normal web networking happens.
Why Do CORS Errors Occur?
There are a few common reasons, and knowing which one you’re hitting makes fixing it much faster.
Your server doesn’t send the header at all: This is the most common one. The server returns JSON with a 200 status, but it never includes
Access-Control-Allow-Origin. The browser rejects it.The origin doesn’t match: During local development, your add-on UI might be coming from
https://localhost:5241. Once you create a private or public listing, it comes from something likehttps://abc123.wxp.adobe-addons.com. If your server is still only set to allowlocalhost, the hosted version of your add-on will get blocked.The preflight (OPTIONS) request fails: For certain types of requests, like a
POSTwith aContent-Type: application/jsonheader, or requests with aAuthorizationheader, the browser doesn't just send your request. It first sends a small "permission check" request using theOPTIONSmethod. Your server needs to respond to that OPTIONS request with a 200 or 204 and the right headers. If your server returns a 401 or 403 for OPTIONS, the real request never even gets sent. You'll see the word "preflight" in the error message when this is the issue.
In Express.js, thecorspackage usually handles preflight requests automatically when configured correctly. Most preflight issues happen because:
CORS middleware is added after the auth middleware
Custom middleware blocks
OPTIONS
Credentials with a wildcard. If you use
fetch(url, { credentials: 'include' })to send cookies cross-origin, the browser won't acceptAccess-Control-Allow-Origin: *. You have to specify the exact origin and also sendAccess-Control-Allow-Credentials: true. That said, most add-ons use a Bearer token in aAuthorizationheader instead of cookies, and don't run into this.
How to Fix CORS at Each Stage
Stage 1: Local Development
When you’re developing on your own computer, both the add-on and your backend are running locally. You want to move fast and not get bogged down in configuration. The simplest approach is to allow all origins with a wildcard:
Access-Control-Allow-Origin: *This tells the browser: any webpage’s JavaScript is allowed to read responses from this server. It’s a wide-open policy, and that’s fine while you’re learning and building. Just don’t use it once real users are involved.
First, install the cors package for Express:
npm install corsThen add it to your server:
const express = require("express");
const cors = require("cors");
const app = express();
app.use(cors({ origin: "*" }));
app.use(express.json());
app.post("/api/hello", (req, res) => {
res.json({ ok: true });
});
app.listen(3000, () => {
console.log("Server running on port 3000");
});That’s really all you need for local development. Test in Chrome DevTools → Network tab to confirm it’s working from the browser.
Stage 2: Private Listing
(If you’re not sure how to set up a private/public listing, just watch this video (https://youtu.be/lm02Mowy9uo?si=MmD5mnODGPn3rVIH) I made, which shows you exactly how.)
When you create a private listing, your add-on is packaged and hosted by Adobe, not by your local machine. You share a link with teammates or your friends, they open Adobe Express with that link, and your add-on UI loads from Adobe’s servers.
This means the origin of the page making fetch() calls changes. Instead of https://localhost:5241, it's now something like:
https://abc123.wxp.adobe-addons.comSo even though your backend URL did not change, the browser now sees the request as coming from a different origin.
If your server still only allows localhost, the request gets blocked by CORS.
How to find your Add-on URL:
Open the Adobe Express developer portal.
2. Go to Your Add-ons → select your add-on.
3. Click the Settings tab.
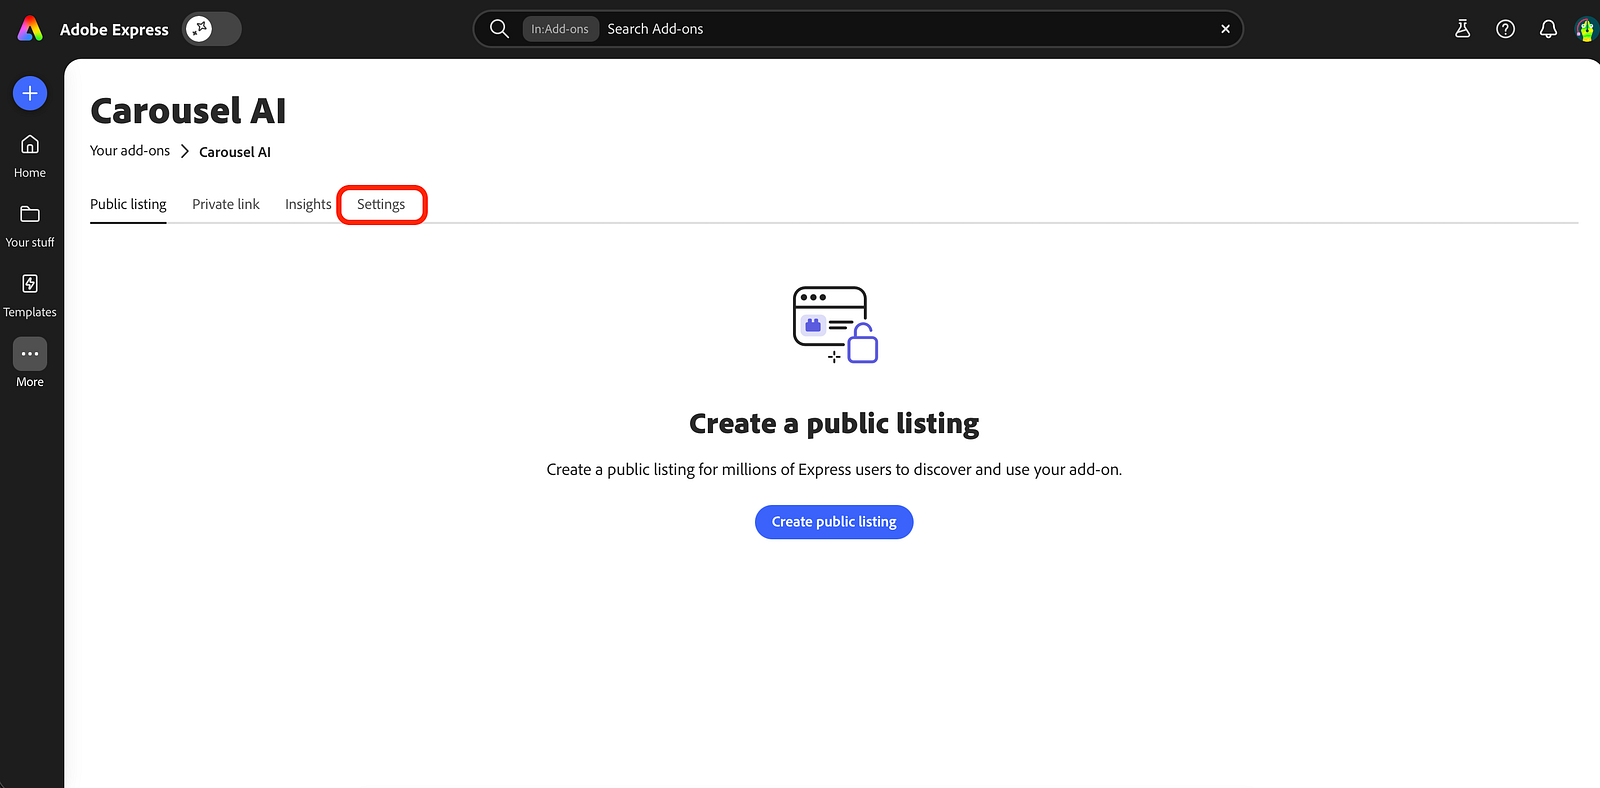
4. Under Add-on URL, click Copy. It’ll look like https://abc123.wxp.adobe-addons.com/.
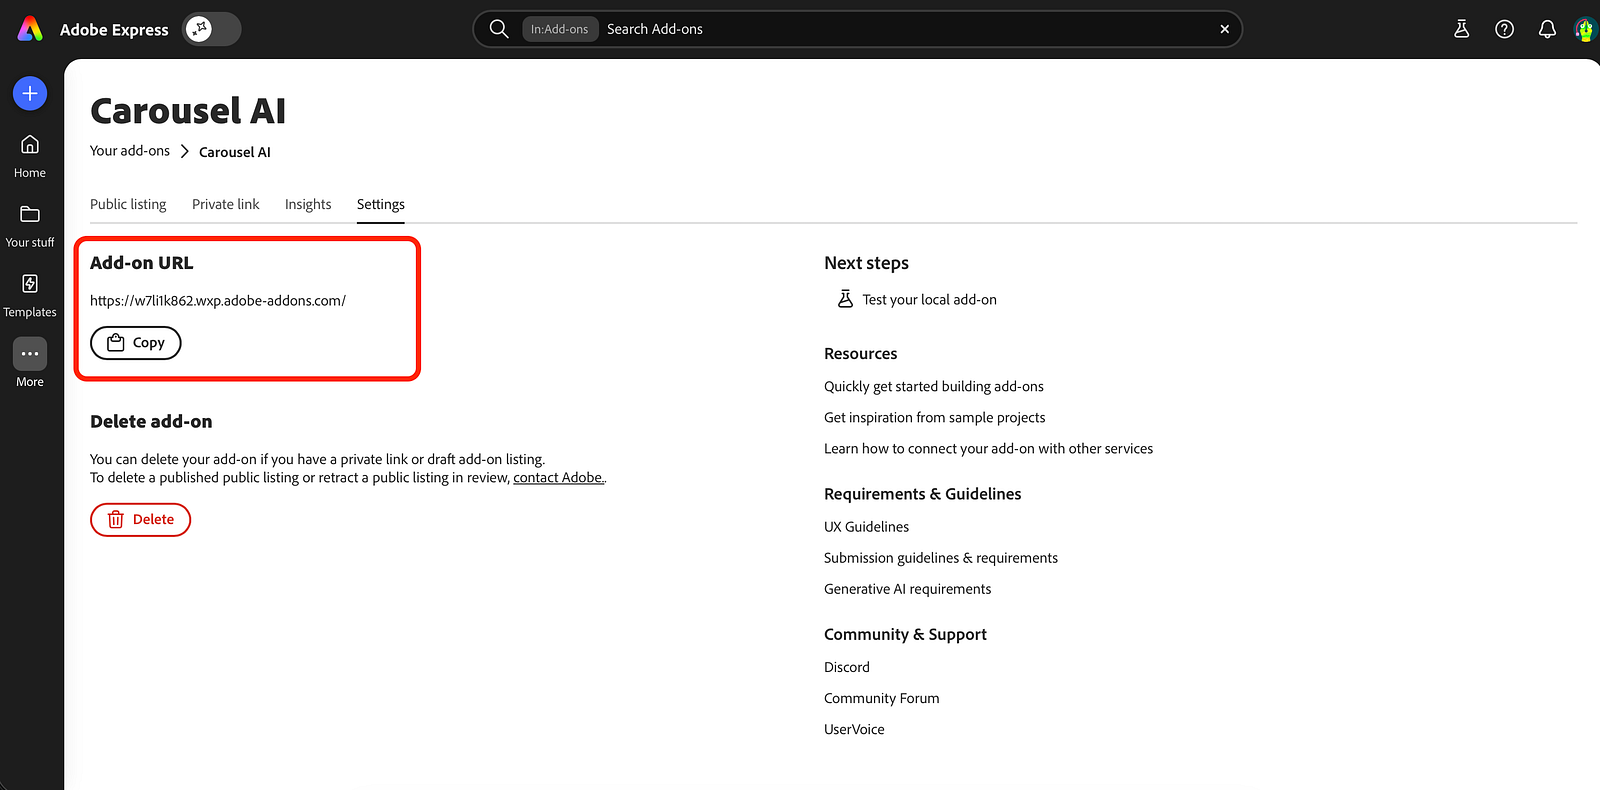
Use that origin in your server’s CORS config (without the trailing slash):
const express = require("express");
const cors = require("cors");
const app = express();
const allowedOrigins = [
"https://abc123.wxp.adobe-addons.com", // from Settings → Add-on URL
"https://localhost:5241", // your local dev port
];
app.use(
cors({
origin(origin, cb) {
// Allow requests with the defined origins only
if (!origin || allowedOrigins.includes(origin)) return cb(null, true);
return cb(null, false);
},
methods: ["GET", "POST", "PUT", "PATCH", "DELETE", "OPTIONS"],
allowedHeaders: ["Content-Type", "Authorization", "X-Requested-With"],
maxAge: 86400, // cache preflight response for 24 hours
})
);
app.use(express.json());The Add-on URL is stable; it doesn’t change between your private link and your public listing. So once you’ve added it here, you’re set for both.
Stage 3: Public Listing
For a public listing, your add-on goes through Adobe’s review process and becomes discoverable in the Adobe Express marketplace. Real users can find and install it.
From a CORS standpoint, nothing changes about the origin. Your add-on UI still loads from the same https://abc123.wxp.adobe-addons.com origin. The CORS config you set up for the private listing still works.
What does change is everything around it:
Your backend needs to be hosted on the cloud:
http://localhost:3000works when you're testing yourself, but reviewers and real users can't reach your laptop. You'll need to deploy your backend somewhere: AWS, Render, Railway, Vercel, Fly.io, etc.Prefer explicit origins over
*. Once real users are involved, you don't want random other websites to be able to call your backend. Lock it down to your Add-on URL and any other origins you actually control.Never ship API keys in the add-on bundle. In production, secrets live on your server in environment variables (a
.envfile or your hosting provider's secret management), not in your add-on code.
If You are Still Stuck? Here’s How to Debug
Open Chrome DevTools → Network tab. Look for a request with a method OPTIONS. That's the preflight. Check:
Did it get a 2xx status? If it got 401, 403, or 404, your auth middleware is running before CORS. Move
app.use(cors(...))to the very top of your server, before anything else.Does the response have
Access-Control-Allow-Origin,Access-Control-Allow-Methods, andAccess-Control-Allow-Headers? If those headers are missing, your CORS setup isn't running.
Once the OPTIONS request looks clean, check the actual POST/GET request right after it. By that point, it should work.
Common Questions
Does my backend have to be separate?
Yes, it’s a completely separate project with its ownpackage.json(if you're using Node.js), its own dependencies, and its own startup command. You run it separately from your add-on. Think of them as two different apps that happen to talk to each other.Why can’t I just put everything in the add-on?
Because the add-on runs in the browser, and the browser code is fully visible to anyone who opens DevTools. API keys, database credentials, and business logic that shouldn’t be inspectable or copyable belong on a server where users can’t see them.Is the CORS config different for a private listing vs a public listing?
Not for the origin string, it’s the sameAdd-on URLin both cases. The difference is that for a public listing, your backend has to be deployed somewhere real users can reach it over HTTPS.Why does OPTIONS show up in my Network tab?
The browser sends an OPTIONS preflight automatically before certain types of cross-origin requests (like a POST with a JSON body or an Authorization header). It’s the browser asking your server, “What are you going to allow?” before committing to the real request. Your server needs to respond to it correctly.Is Node.js + Express the only backend option I have to use?
No. You can use any backend stack or service: Express, FastAPI, Flask, Django, Next.js APIs, AWS Lambda, Firebase Functions, Cloudflare Workers, or anything else.
CORS is not tied to Express or Node.js. It’s just about your backend returning the correctAccess-Control-*headers.
Different frameworks configure CORS differently:Express uses the
corsmiddlewareFastAPI uses
CORSMiddlewareFlask uses
flask-corsAWS Lambda usually configures CORS in API Gateway or response headers
Cloudflare Workers manually return CORS headers in the response
But the core idea is always the same:
Your backend must allow requests coming from your Adobe Express add-on origin.
Wrapping Up
CORS errors feel like they come from the add-on because that’s where the red console text appears. But you’re actually looking at a browser safety rule that sits between two separate programs, your add-on UI and your backend API. Once you understand that separation, the fix is pretty straightforward: configure your server to send the right response headers for wherever your add-on is currently being served from.
When things break, Chrome’s Network tab is your best friend. Check OPTIONS first, then your actual request. The headers will tell you exactly what’s missing.
Further reading: Iframe Runtime Context & Security · Add-on Architecture · Private Distribution · Public Distribution
If you’re still facing some problem, you can reach out to me directly on Twitter and LinkedIn. I’m always happy to help fellow developers in the Express ecosystem.
Thank you for your attention to this matter. See you in the next one :)
How to Add a Payment Gateway to an Adobe Express Add-On (Without Losing Your Mind)
If you’re building an Adobe Express add-on and wondering how to collect payments from users, you’ll run into this quickly: Adobe doesn’t provide a payment service for you. Official monetization guidance is clear: Checkout is handled by you outside of Express (per the Adobe Express add-on monetization guidelines). That isn’t a blocker; it just means you need a small, normal web backend and a payment provider.
This blog walks through the flow in plain order, step by step.
The whole system in six steps
Before frameworks or dashboards, you need to understand the following loop:
A user taps Subscribe in your add-on.
Your server asks the payment provider (Stripe, Dodo, Paddle, etc. ) for a checkout session and gets back a URL.
The user pays on the payment provider’s hosted page.
The provider sends a webhook to your server. This is how you know payment really happened.
Your database adds the user’s subscription and updates customer IDs.
The add-on calls your “status” API and updates the UI.
If that loop is clear, the rest is easy. Otherwise, tutorials feel confusing.
What you actually need (three pieces)
1. A backend
Any stack is fine: Node + Express, Next.js route handlers, Fastify, Hono, FastAPI, etc. It must be able to:
Store secret keys (never in the add-on bundle).
Speak HTTPS in production.
Receive POST webhooks from the internet.
For local development, you can use a tunnel (ngrok, Cloudflare Tunnel, etc.) so webhooks can reach your local backend server.
2. A database
You will need a database that, at a minimum, ties an Adobe user ID to a billing state, for example:
Adobe user ID
Provider customer ID (once you have it)
Plan/subscription status
Optional: subscription ID, renewal dates, credits
3. A payment provider
You will need a payment provider; the architecture will be the same everywhere, only the API names will change.
Examples: Dodo Payments, Stripe, Paddle, Lemon Squeezy (merchant-of-record style products). Pick one, read their checkout + webhook docs, and mirror the steps below.
Step 1: Create products in the payment provider dashboard
Create your plans (monthly, yearly, whatever you sell). Copy each product or price ID, your backend will map "monthly" → that ID. For example, the shape might be: prod_... or whatever your dashboard shows.
Step 2: Environment variables (server only)
These are sensitive values your server needs to securely communicate with your payment provider. They should never be exposed to the client.
Typical names (rename to match your provider’s docs):
API secret key for server-to-server calls
Webhook signing secret
One env var per product/price id
Never put these in the add-on, never commit them to a public repo, and rotate them if they leak.
Step 3: Checkout API on your server
Next, you will need to run the checkout API on your server.
Example route: POST /api/create-checkout
Body (JSON): e.g. { "userId": "…", "plan": "monthly" }
The Server does this: validate input → map plan → provider product id → call provider API to create checkout session → return { "checkoutUrl": "https://…" }.
You’ll also set a return_url (or the provider’s equivalent) to a page on your domain that says “you’re done, go back to Express.” That page is not inside the add-on iframe.
Step 4: Open checkout from the add-on (easy to get wrong)
Here are two critical details:
A. Popup before await
Open a pop-up in the same user gesture as the button click. before you await fetch(...). If you await first, many browsers treat window.open as not user-initiated and block it.
B. Call your API with a full URL
You need your deployed API origin, e.g.:
fetch(“https://api.yourdomain.com/api/create-checkout", { … })
Example pattern:
const popup = window.open("about:blank", "billing", "width=1024,height=720");
if (!popup) {
  // Tell the user to allow popups for this site
  return;
}
const res = await fetch("https://api.yourdomain.com/api/create-checkout", {
  method: "POST",
  headers: { "Content-Type": "application/json" },
  body: JSON.stringify({ userId, plan: "monthly" }),
});
const data = await res.json();
if (data.checkoutUrl) {
  popup.location.href = data.checkoutUrl;
} else {
  popup.close();
}
Step 5: Webhooks (where many integrations break)
Route something like: POST /api/webhook. The path is up to you; register that full HTTPS URL in the payment provider dashboard.
Your server must:
Read the raw body as text/bytes for signature verification (don’t only parse JSON first if your library needs the raw string).
Verify the signature using the provider’s docs (do not skip this).
Handle duplicates; the same event may be delivered more than once; use idempotency (e.g., store event IDs you’ve already processed).
Update the database from the verified payload.
Step 6: Subscription data model
Here is a minimal mental model of the subscription data model:
User/billing row: Adobe user ID, provider customer ID, maybe email
Subscription row: provider subscription ID, status, plan, period end
Webhook log / processed ids: for idempotency
You can start with one wide users table and normalize later.
Step 7: Status API (source of truth)
This endpoint acts as the single source of truth for the client, returning the user’s actual billing state based on your backend data.
Example: GET /api/status?userId=…
Response might include isSubscribed, plan, credits, etc.
This must be read from your database (updated by webhooks).
Step 8: Sync the add-on after payment
After checkout, webhooks can take a few seconds. Here is a common pattern:
Poll
GET /api/statusevery few seconds for a short window, orRefresh when the user taps “I finished paying,” or
Optional: your
return_urlpage runs in the pop-up and usespostMessageto tell the add-on to refresh, only if you’re comfortable locking down which origins you accept.
Step 9: CORS (another easy mistake)
Browsers only allow your add-on to call your API if your server sends the right CORS headers.
Important: Access-Control-Allow-Origin does not support patterns like https://*.adobe-addons.com. You must either allow all origins using * (with some limitations) or specify one exact origin.
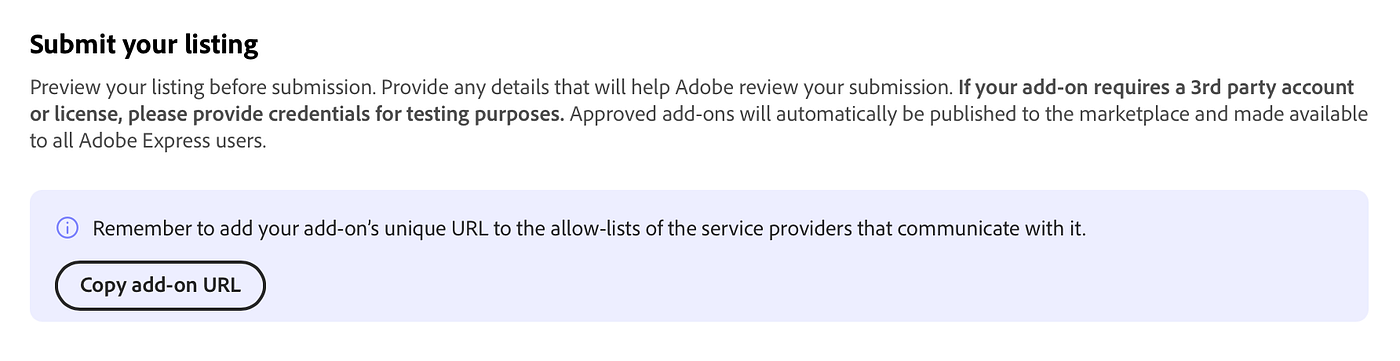
When you set up your add-on in Adobe Express, Adobe gives its own web address (URL).
Add that URL to your server’s allowed list. You will get that URL while creating the public listing of your add-on in the submission form (it usually looks like https://<id>.wxp.adobe-addons.com).
And you can simply allow all origins when you are building and testing your add-on.
Also, make sure your server accepts OPTIONS requests for GET and POST when sending JSON (Content-Type: application/json).
Details: https://developer.adobe.com/express/add-ons/docs/guides/learn/platform-concepts/context
Step 10: Manifest: allow popups
Hosted checkout opens in a new window. Your panel entry needs sandbox permissions, for example:
"permissions": {
"sandbox": ["allow-popups", "allow-popups-to-escape-sandbox"]
}
Exact structure lives in the manifest reference under your entryPoints panel config.
Nice-to-haves before you ship publicly
Customer portal link (cancel, update card), often required for a fair UX and aligns with transparency expectations in Adobe’s monetization guidelines.
Return URL page copy that matches success versus cancel.
Marketplace listing text that matches real pricing, renewal, and how to get support/refunds where applicable.
Common mistakes (and how to fix them)
Putting API keys in the add-on
What goes wrong: Anyone can inspect your frontend code and steal the key. That can lead to abuse, unexpected costs, and account compromise.
How to fix it: Move secret keys to your backend only. The add-on should call your backend, and your backend should call third-party APIs.
2. Using a relative fetch URL instead of your API’s full origin
What goes wrong: In Adobe Express, your add-on runs from Adobe’s hosted origin (iframe subdomain), so relative paths can hit the wrong place and fail with 404/CORS errors.
How to fix it: Use your full API URL (for example,
https://api.yourdomain.com/...) or a clear environment variable for it.
3. CORS wildcard misunderstanding
What goes wrong:
Access-Control-Allow-Origin: *is often unsafe, and it breaks credentialed requests (cookies/auth headers). It can also expose your API more than intended.How to fix it: Allowlist exact origins: your localhost during dev and your Adobe add-on origin (the
https://<id>.wxp.adobe-addons.comURL from Add-on Settings). Also handleOPTIONSpreflight properly.
4. No webhook verification or idempotency
What goes wrong: Attackers can send fake webhook calls, or real events can be delivered multiple times, causing duplicate credits/orders/subscription updates.
How to fix it: Verify webhook signatures, store processed event IDs, and ignore duplicates (idempotent handling).
5. Opening the pop-up after await fetch
What goes wrong: Browsers treat it as not user-initiated and block the pop-up, so login/checkout flows fail.
How to fix it: Open the pop-up immediately on user click, then update/navigate it after async work finishes.
6. Trusting the frontend for subscription state
What goes wrong: Users can tamper with the frontend state and unlock premium features without a valid payment.
How to fix it: Treat frontend state as display-only. Verify entitlement/subscription on your backend and return signed/validated access decisions.
Under the hood, you’re building three endpoints and one rule: create checkout, receive webhooks, read status, and always treat the database as truth after verified webhooks. Everything else is provider dashboards, env vars, and polish.
If you’re building something, I’d love to see it, whether it’s useful, experimental, or just something fun. Tag me on Twitter and LinkedIn, I’m always happy to give feedback and help promote new Express add-ons.
Now go build something you’re proud of.
Thank you for your attention to this matter. See you in the next one :)
How I Accidentally Began My Journey With Adobe
If you’d told me a year ago that I’d be building creative tools for Adobe Express and publishing videos and blog tutorials for developers, I probably would’ve laughed in your face.
This wasn’t the plan. I wasn’t strategizing or networking or plotting some grand career move. I wasn’t even aware that this world existed. But somehow, I ended up here anyway. And it’s completely changed the trajectory of my life.
The funny thing about unexpected opportunities is that they rarely announce themselves. They just kind of… happen. And if you’re paying attention, you grab them.
How Everything Started (Spoiler: It Was a Hackathon)
Let me take you back about a year ago.
I was participating in a Canva AI and Integration hackathon, honestly, just for fun and to build something. I created a plugin called Textify that takes an image and extracts its text using OCR and adds it directly to the design. It felt good to build. I was excited about it.
Then the results came in. I didn’t win.
I remember thinking, “Well, that’s that. Back to the drawing board.” I figured the story ended there. It was just a fun project that didn’t pan out. You know how it goes, you build something cool, show it around, and then life moves on.
Except it didn’t.
The Message That Changed Everything
A few weeks after the hackathon, my inbox chimed. There was a message from someone named Ingo from Adobe. He’d seen Textify and basically said: “Would you be interested in building a similar project as an add-on for Adobe Express (perhaps we can fund that)?”
I had no idea Adobe Express even had add-ons at that point.
I was genuinely confused. Fund me how? Build what, exactly? But I was curious, and honestly, a little overwhelmed. This was a door opening that I didn’t even know existed. So I did what any reasonable person would do in that moment: I said yes, despite having no clue what I was walking into.
Learning on the Job (A Lot of Trial and Error)
When I started rebuilding Textify for Adobe Express, I felt like a complete beginner. The documentation was unfamiliar. The platform was completely different from what I’d worked with. Every single thing was new. But the Adobe developer community is very helpful. Whenever I got stuck, I asked someone in the community, and they didn’t say no to help me.
But here’s the thing about obstacles: when you’re actually interested in what you’re building, they’re not nearly as painful as you’d think. Every bug I fixed, every time I had to rethink my approach… I was learning. Not just technical stuff, but patience, attention to detail, and the kind of consistency that matters when you’re shipping real products.
When Textify finally launched on Adobe Express, something hit me. Somewhere out there, someone was actually using something I made. They were opening the tool, using it in their creative workflow, and solving problems with it. That’s a wild feeling. I still remember thinking, “This is real.”
Finding Add-On Number Two
For a while after launching Textify, I wasn’t actively hunting for my next idea. I was just… working. Building things. And then one day, while I was tinkering with something else inside Adobe Express, I noticed something.
There wasn’t a straightforward way to convert code into beautiful, clean visual snippets directly in the editor. It was a gap, small, but clear. I sent a proposal to someone on the Adobe Express team, and he actually encouraged me to build it and offered me funding.
So I did. That tool became Codify.
And that’s when things started moving faster.
Why I Kept Building
Here’s the weird part that I didn’t expect: I wasn’t building these tools to earn some money. I don’t even think I was thinking three steps ahead.
I built them because the work itself was actually addictive.
Watching creators use my tools. Seeing them solve real problems. Knowing that my stuff was saving someone time or making their creative process smoother. That feeling is powerful. It’s the kind of thing that makes you want to keep going, keep improving, keep building the next thing.
Money and recognition are nice, but they’re not why I was staying up late fixing bugs or thinking about features in the shower. I was doing it because I genuinely enjoyed it.
Growing Inside the Ecosystem
Since that first tool, I’ve built quite a few more: Paletify, Rephresely, GlowUp, Design to Code, Carousel AI, and now Clarity.
I also published three videos on the Adobe Developers YouTube Channel to help developers get started with Adobe Express Add-Ons.
I am continuously writing blogs regarding the Express Ecosystem and covering every pain point developers face while building Add-Ons.
I also got a chance to judge and mentor the Adobe Express Add-Ons Hackathon in person at NSUT, Delhi. In this hackathon, many students started with Add-on by watching my videos and reading my blogs, and I also solved the doubts and problems of the students on the go.
And here’s the number that still blows my mind: across all these tools, 10,000+ Adobe Express users are using the tool that I built. It’s amazing, no?
More than ten thousand users.
A year ago, that number was zero. I didn’t know anyone at Adobe. I had no network inside the company. I didn’t even understand how the add-ons ecosystem worked. I just took the first step and figured it out as I went.
What This Year Really Taught Me
Looking back on everything that happened, there are a few things that became crystal clear to me:
Inspiration often comes from things that feel like failure. Losing that hackathon wasn’t the end; it was the beginning of something much bigger.
One message can genuinely redirect your entire path. If Ingo hadn’t sent that message, none of this would have happened.
Small ideas can compound into something significant. I didn’t start with a five-year plan. I built one tool, then another, then another.
Sometimes you just need one door to open. Everyone talks about having a network, but sometimes all you need is one person to believe in what you’re doing.
Consistency matters way more than talent. I wasn’t the most skilled developer when I started. But I kept shipping. I kept improving. That adds up.
It’s okay to not have all the answers. I learned as I went. I didn’t need to understand everything before I started.
But if I’m being honest, the biggest lesson is this: Never underestimate where a single small project can take you. I thought Textify was just a fun hackathon entry. I had no idea it would become the first domino in a chain of events that would change how I work and what I build.
Where I Am Now
I’m still learning. Still building. Still figuring things out as I go. Right now I’m working on tools like Design to Code, exploring new ways to help creators/developers do more with less friction.
And you know what? It feels like I’m just getting started.
Why I’m Telling You All This
I’m sharing this story because I want it to land with someone who needs to hear it right now.
Maybe you’ve been thinking about building something, but you’re afraid it won’t matter. Maybe you got rejected from something, and you’re wondering if it’s a sign to quit. Maybe you have an idea, but it seems too small, too niche, or too risky to actually pursue.
Here’s what I know from living through this: The opportunity that changes your life often doesn’t look like an opportunity at first.
It might look like losing a hackathon. A random DM from someone you don’t know. An idea that pops into your head that you almost ignore. A tool you almost decided not to build because you weren’t sure if it mattered.
But if you follow it anyway, if you say yes to the uncertain thing, your whole direction might shift.
Just like mine did.
The best part? I didn’t have to have it all figured out before I started. I just had to show up and do the work.
You can too.
Hope you liked this story!!
See ya in the next one :)
Follow me on X: https://x.com/fardeentwt
Adobe Express Add-On MCP Server is All You Need
Introduction
Building Adobe Express add-ons can be complex. The Adobe Express Add-on MCP Server simplifies this by connecting your IDE with Adobe Express APIs and documentation, providing real-time guidance and code suggestions.
What is the Adobe Express Add-on MCP Server?
The Adobe Express Add-on MCP Server is a Model Context Protocol (MCP) server that connects AI-assisted IDEs (like Cursor) with Adobe Express add-on resources. It provides:
Real-time access to Adobe Express add-on APIs and documentation
TypeScript definitions and code examples
Context-aware guidance directly in your editor
Best practices and patterns for add-on development
MCP enables AI assistants to access external tools and data sources, making them more useful for specific domains like Adobe Express add-on development.
Benefits of Using the MCP Server
On-demand expertise
Your AI assistant gains deep knowledge of Adobe Express add-on APIs, providing accurate guidance without leaving your editor.Faster development
Generate code that follows best practices from the start, reducing debugging time and speeding up the cycle.LLM-agnostic compatibility
Works with any LLM that supports MCP, so you can use your preferred AI tools.Real-time documentation access
Access the latest documentation and TypeScript definitions without switching contexts.Enhanced learning
For developers new to Adobe Express add-ons, it serves as an interactive learning tool with real-time guidance.
How Adobe Express MCP Server Makes Building Adobe Express Add-ons Simple
Before the MCP Server
Switching between the editor and the documentation
Searching for API examples
Guessing correct patterns
Manual debugging of API usage
Time-consuming trial and error
With the MCP Server
Contextual code suggestions in your editor
Instant access to relevant documentation
Code generation aligned with best practices
Real-time guidance on API usage
Faster iteration and fewer errors
You don’t have to read documentation yourself (lol)
How to Set Up the MCP Server in Cursor
Open Cursor Settings:
- Go to Cursor Settings > Tools & MCP
- Click on the “Add Custom MCP” button
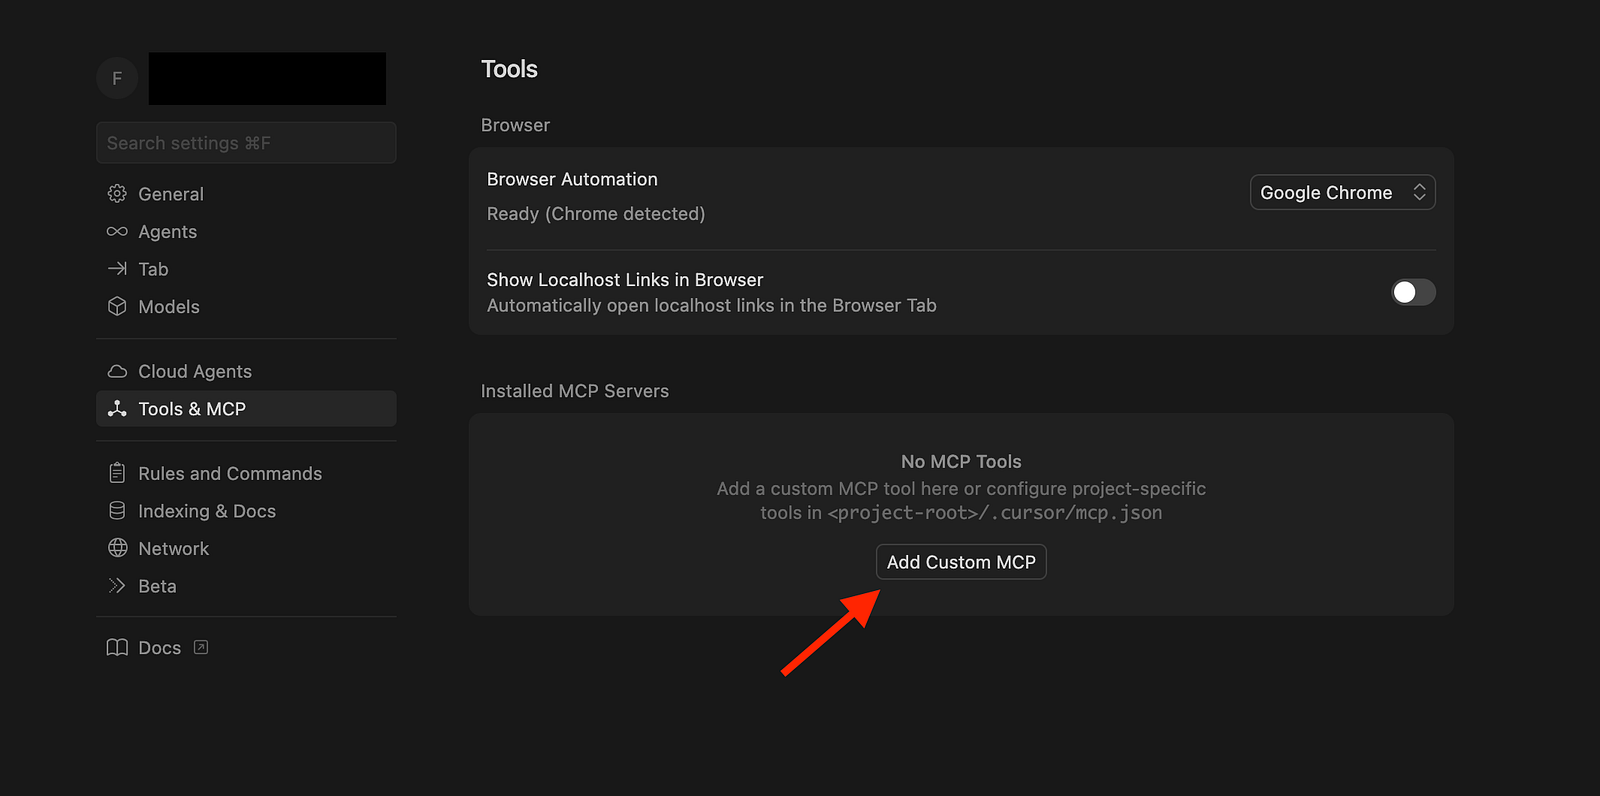
2. Add the following configuration:
{
  "mcpServers": {
    "adobe-express-add-on": {
      "command": "npx",
      "args": ["@adobe/express-add-on-dev-mcp@latest", "--yes"]
    }
  }
}
3. Restart Cursor:
Completely quit and restart the Cursor to apply changes
4. Verify the connection:
Open a project in Cursor
Open Cursor’s AI chat (
Cmd + Lon Mac orCtrl + Lon Windows/Linux)Test with: “Can you access the Adobe Express Add-on MCP Server?”
Or you will see in the MCP setting that the
adobe-express-add-onis enabled

How to Use the MCP Server in Cursor
Once set up, the MCP server enhances your workflow in several ways:
Automatic tool usage
The Cursor Agent automatically uses MCP tools when relevant. For example:
- “How do I create a rectangle in Adobe Express add-on?”
- “Show me how to add an image to the document.”
- “What’s the best way to handle user interactions in my add-on?”Explicit tool invocation
You can explicitly request tool usage:
- “Use the Adobe Express MCP server to find documentation on document sandbox APIs.”
- “Get me examples of how to use the editor API.”Tool execution process
When a tool is invoked:
1. The cursor shows a message requesting approval
2. Tool call arguments are displayed (expandable)
3. The tool executes upon approval
4. Response appears in chatPractical examples
Example 1: Understanding the manifest
Ask: “What should I include in my manifest.json for an Adobe Express add-on?”
The MCP server can explain your manifest structure:
{
    "testId": "eb6f56e2-47a3-4521-8fc9-0913365943da",
    "name": "Test Addon",
    "version": "1.0.0",
    "manifestVersion": 2,
    "requirements": {
        "apps": [
            {
                "name": "Express",
                "apiVersion": 1
            }
        ]
    },
    "entryPoints": [
        {
            "type": "panel",
            "id": "panel1",
            "main": "index.html",
            "documentSandbox": "code.js"
        }
    ]
}
Example 2: UI and sandbox communication
Ask: “How do I communicate between the UI and document sandbox?”
The MCP server can explain the pattern used in your code:
addOnUISdk.ready.then(async () => {
   console.log("addOnUISdk is ready for use.");
   // Get the UI runtime.
   const { runtime } = addOnUISdk.instance;
   // Get the proxy object, which is required
   // to call the APIs defined in the Document Sandbox runtime
   // i.e., in the `code.js` file of this add-on.
   const sandboxProxy = await runtime.apiProxy("documentSandbox");
   const root = createRoot(document.getElementById("root"));
   root.render(<App addOnUISdk={addOnUISdk} sandboxProxy={sandboxProxy} />);
});
Example 3: Debugging help
Ask: “Why is my rectangle not appearing in the document?”
The MCP server can help troubleshoot common issues like:
Missing
insertionParentusageIncorrect color format
Sandbox API is not properly exposed
Real-World Workflow Example
Here’s how the MCP server helps in a typical development session:
Starting a new add-on:
- Ask: “How do I set up a new Adobe Express add-on project?”
- Get: Step-by-step setup with best practicesAdding functionality:
- Ask: “How do I add text to the document?”
- Get: Code examples with proper API usageStyling elements:
- Ask: “How do I apply colors and effects to shapes?”
- Get: Examples usingmakeColorFilland other styling APIsHandling user input:
- Ask: “How do I handle file uploads in my add-on?”
- Get: Guidance on file handling, as shown in your App.jsx:
Conclusion
The Adobe Express Add-on MCP Server streamlines add-on development by:
Providing real-time, contextual guidance
Reducing time spent on documentation lookups
Generating code that follows best practices
Accelerating the development cycle
Making Adobe Express add-on development more accessible
Whether you’re new to Adobe Express add-ons or building complex integrations, the MCP server acts as an on-demand expert in your editor.
This is what I want you to do next
Set up the MCP server in Cursor (see setup instructions above)
Start a new Adobe Express add-on project or clone the given GitHub repo below
Ask your AI assistant questions about Adobe Express add-on development
Build faster with real-time guidance and code suggestions
The Adobe Express Add-on MCP Server is all you need to build powerful, well-structured Adobe Express add-ons efficiently.
Resources:
Adobe Express Add-on Documentation (https://developer.adobe.com/express/add-ons/docs/guides/?aio_external)
MCP Server Setup Guide (https://developer.adobe.com/express/add-ons/docs/guides/getting_started/local_development/mcp_server/)
Model Context Protocol Documentation (https://modelcontextprotocol.io)
Github Repository to start (https://github.com/Fardeen26/adobe-express-addon-mcp)
Community Adobe Express MCP server (https://github.com/Fardeen26/adobe-express-addon-mcp)
Keep building anons, see you in the next one :)
You can follow me on twitter btw: https://x.com/fardeentwt
How to Find the Adobe Express Add-on Ideas to Build
Finding the right idea for an Adobe Express add-on is harder than building it. I’ve shipped 6 add-ons in the past year, 4 funded by Adobe for and the most common question aspiring developers have is: “How do I come up with ideas that people actually use?”
The truth? Great add-on ideas aren’t found in brainstorming sessions. They’re discovered through systematic observation, genuine use, and pattern recognition across creative workflows.
Here’s the exact framework I use to find add-on ideas that solve real problems and attract real users.
1. Be Genuinely Interested in Creative Tools (Non-Negotiable)
This isn’t optional. If you’re building Express add-ons purely for money or grants, users will feel it, and your add-ons will fail.
I’ve always been fascinated by creative tools: how designers think, how workflows break down, how tiny friction points accumulate into hours of wasted time. When I discovered Adobe Express and its add-on SDK, I saw an opportunity to solve problems for a platform I actually wanted to use.
Why genuine interest matters:
You’ll notice problems others miss (because you’re living in the product)
You’ll stay motivated through the hard parts (debugging, user support, iteration)
You’ll build with empathy (you ARE the user)
Ask yourself: If Adobe never funded your work, would you still build Express add-ons? If the answer is “maybe not,” you’re building on shaky ground.
My test: I built Paletify AI (color palette generator) with zero expectation of funding. I just wanted it to exist. It now has 650+ active users and taught me more about the platform than any other project.
2. Use Adobe Express as Your Daily Design Tool
This is where most developers get it wrong: they build FOR Express users without BEING Express users.
I use Adobe Express nearly every day, not just for testing add-ons, but for actual design work: social media graphics, presentation slides, quick mockups. This constant immersion exposes friction points that don’t show up in feature request forums.
How I found real add-on ideas through daily use:
Codify (Code → Beautiful Snippets)
I wanted to share a code snippet on social, but the workflow was painful:
Copy the code
Paste into a design tool
Manually style, color, and format it (10+ minutes wasted)
The gap: Express is great for design, but it isn’t built to understand code or apply syntax highlighting.
The add-on: Codify takes any code snippet and instantly turns it into a beautiful, customizable design with syntax highlighting, themes, and layout options. It saves creators and developers from all the boring formatting work, and has now helped 450+ users create share-worthy code graphics effortlessly.
3. Think From Multiple User Perspectives
Your workflow ≠ everyone’s workflow.
I’m a developer who occasionally designs. But Express serves marketers, educators, small business owners, influencers, and enterprise teams, each with different pain points.
The framework: Put yourself in different user roles and ask specific questions:
As a Marketer:
“How do I maintain brand consistency across 50+ social posts?”
“How do I quickly localize content for different regions?”
“How do I A/B test copy variations efficiently?”
Add-on idea born from this: Repheresely (AI text rewriting with brand voice presets). Marketers can define their brand voice once and apply it to all designs, ensuring consistency without manual editing.
As an Educator:
“How do I create engaging lesson materials quickly?”
“How do I provide feedback on student designs?”
“How do I ensure accessibility in educational content?”
Add-on idea born from this: Textify became surprisingly popular for this kind of use case, extracting text from textbook images to create digital worksheets.
As a Small Business Owner:
“How do I create professional-looking content without design skills?”
“How do I save money on stock photos/assets?”
“How do I quickly generate variations of the same design?”
Add-on idea born from this: Paletify AI (color palette generator). Small business owners struggle with color theory. Paletify generates harmonious palettes from simple prompts like “warm autumn cafe,” removing the guesswork.
As an Enterprise Team:
“How do we enforce brand guidelines across team members?”
“How do we streamline approval workflows?”
“How do we extract analytics from our design output?”
Add-on idea born from this: Brand voice management in Repheresely 2.0, allowing teams to create shared brand presets so every team member writes in the same voice.
4. Explore Adjacent Online Tools
Express doesn’t need to be feature-complete; it needs to be extensible.
One powerful strategy: identify popular standalone web tools that Express users might already be using externally, and integrate them directly into Express.
Examples of standalone tools:
Background Removal
Standalone tool: Remove.bg (popular, but requires leaving Express)
Add-on opportunity: Build background removal directly into the Express workflow
Why it works: Users avoid context-switching and export/import cycles
Code-to-Image Generators
Standalone tool: Carbon, Ray.so (for creating pretty code screenshots)
My add-on: Codify (450+ users) brings this functionality INTO Express
Why it works: Developers creating technical content can stay in Express for the entire workflow
Grammar Checking
Standalone tool: Grammarly (users copy/paste text to check, then paste back)
My add-on: Repheresely 2.0 checks grammar directly on Express designs with AI explanations
Why it works: Zero disruption to creative flow
How to systematically identify these opportunities:
Google “online [X] tool” for common tasks:
Image enhancement
Color extraction
Font pairing
QR code generation
Photo editing effects
Text-to-speech
Watermarking
2. Check ProductHunt’s “Productivity” and “Design Tools” categories
Sort by most upvoted
Look for simple, single-purpose tools
Ask: “Would this be better integrated into Express?”
3. Browse browser extensions (Chrome Web Store, Firefox Add-ons)
Extensions = proof someone needs this functionality
If it exists as a browser extension, it might work as an Express add-on
Action step: Spend 30 minutes browsing ProductHunt’s design tools section. Make a list of 10 tools that Express users might find valuable. That’s 10 potential add-on ideas.
5. Study Competitor Creative Tools
Controversial take: Your best add-on ideas might come from Canva or Figma.
I know this sounds counterintuitive, but shouldn’t we make Express unique rather than copy competitors? But here’s the reality: users switch platforms because of missing features. If you can bring a Figma-level feature to Express via an add-on, you make Express MORE competitive.
Case study: How I got the Design to Code idea
I was browsing Figma plugins and discovered “Figma to Code” converters that export designs as HTML. Thousands of developers use these plugins.
My thought process:
“Designers use Figma for UI design, then export to code for development.”
“Express is positioning itself for UI/UX design workflows.”
“But Express has NO design-to-code export functionality.”
“If I built this for Express, it would unlock an entire new user segment: developers who design.”
Result: Design to Code add-on, funded by Adobe, currently in development. It converts Express designs to production-ready HTML/React/SwiftUI with 95%+ accuracy.
6. Follow Adobe’s Stated Priorities
This is the easiest strategy and most developers ignore it.
Adobe occasionally publishes what they want in the ecosystem. In their blog post “7 More Ideas for Much-Requested Adobe Express Add-ons,” they explicitly listed:
Grammar and spell check
Advanced text find/replace with AI for brand language alignment
Import text from copy management platforms
Generate content for games/activities (bingo, crosswords)
Create advanced charts and infographics
Apply image/video effects to imported assets
Generate educational content (presentations, lesson plans)
Guess what I built immediately after reading this?
Repheresely 2.0, which addresses THREE of these requests:
✅ Grammar and spell check (with AI explanations)
✅ Advanced text refinement for brand language alignment (custom brand voice prompts)
✅ Text manipulation with AI (rewriting, translation)
Why this strategy works:
Adobe has already validated demand (these are “much-requested”)
Adobe is more likely to fund ideas aligned with their priorities
You’re solving problems Adobe considers important
Action step: Subscribe to Adobe Express blogs, developer newsletters, and community forums. When Adobe publishes feature requests or ecosystem priorities, treat them as a roadmap.
7. Join the Express Developer Community
Joining the express developer community is very crucial. If you need any kind of help regarding anything, then the community is there for you.
Where to find the community:
Adobe Express Add-on Developers LinkedIn Group (where I post most of my updates)
Adobe Developer Forums
Discord channel
Twitter
What to listen for:
“How do I…” questions → Feature gaps that add-ons could fill
“I’m building… but stuck on…” → Common technical challenges that tools could solve
“My users are asking for…” → Direct demand signals
8. Think Beyond Features - Think About Workflows
The shift that changed how I find add-on ideas: Stop thinking about “What feature is missing?” and start thinking “What workflow is broken?”
Feature thinking (surface level):
“Express needs a better color picker.”
“Express should have more fonts.”
“Express needs GIF export.”
Workflow thinking (deeper):
“Designers creating social media campaigns have to resize the same design 5+ times for different platforms. How can I automate that entire workflow?”
“Marketing teams struggle with brand consistency when multiple people create content. How can I ensure brand voice across all team members’ designs?”
“Non-native English speakers using Express make grammar mistakes in their designs. How can I help them create professional-quality text without external tools?”
Workflow thinking leads to more valuable add-ons because you’re solving end-to-end problems, not just adding a button.
Action step: Pick one design task (e.g., “creating Instagram posts”). Map out the ENTIRE workflow from start to finish. Identify every friction point. Each friction point is a potential add-on.
Final Thoughts: Ideas Are Cheap, Execution Is Everything
I shared 8strategies for finding add-on ideas. But here’s the truth: ideas don’t matter much.
In the past year, I’ve had 20+ add-on ideas. I’ve only built 6. The other 14 were either:
Not validated (nobody wanted them)
Too complex (couldn’t build in a reasonable time)
Not aligned with my skills/interests
The developers who succeed aren’t the ones with the most ideas; they’re the ones who:
Pick ONE idea
Validate it quickly
Build an MVP fast
Ship it and gather feedback
Iterate based on real usage
If you build something using these strategies, I’d love to see it. Tag me on Twitter or LinkedIn, I’m always happy to give feedback and help promote new Express add-ons.
Now go build something you are proud of.
Thank you for your attention to this matter. See you in the next one :)
Building an Adobe Express Add-on: Markdown Converter
This guide walks you through creating a simple add-on that converts Markdown files to styled text in Adobe Express documents. After completing this tutorial, you’ll understand the fundamentals needed to build your own add-ons.
Prerequisites
Adobe Express account (create one at new.express.adobe.com)
Node.js 18 or higher
Basic knowledge of React and JavaScript
Step 1: Enable Add-on Development
1. Open new.express.adobe.com in your browser
2. Click your avatar icon in the top right, then the gear icon to open Settings
3. Enable “Add-on Development” (you may need to accept Developer Terms)
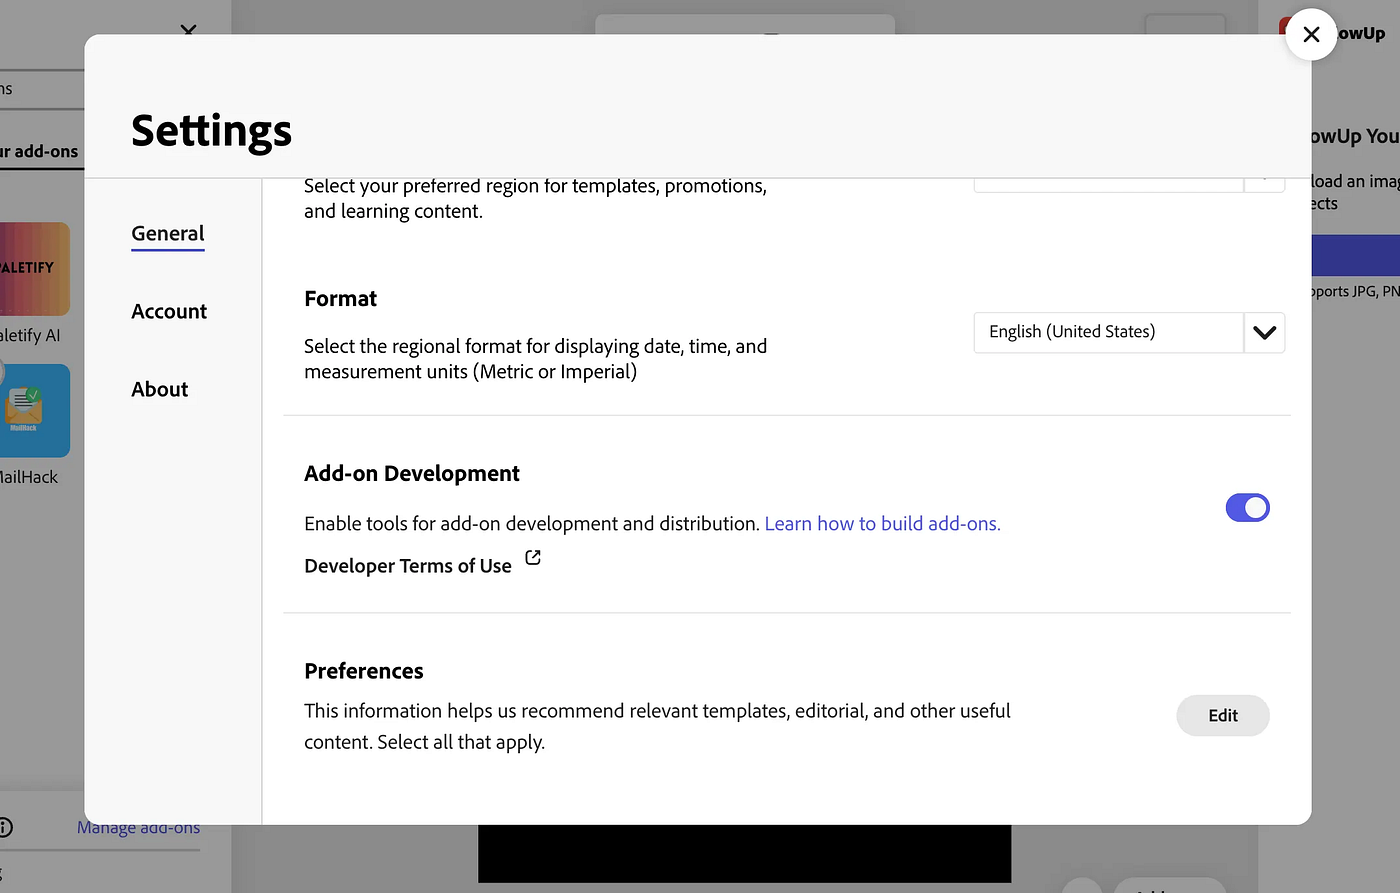
4. Close Settings
We already discussed these things how to set up the development environment and many other things, in the previous blog; you can check it out here (https://www.fardeen.me/blogs/cmhg3u1630000aprc4jz7d0ly).
Step 2: Create Your Add-on Project
Open your terminal and run:
npx @adobe/create-ccweb-add-on markdown-to-text --template react-javascript-with-document-sandboxThis creates a React-based add-on template with Document Sandbox support. Navigate to the project:
cd markdown-to-text
npm install
npm run build
npm run start
The server will start and display a local URL.
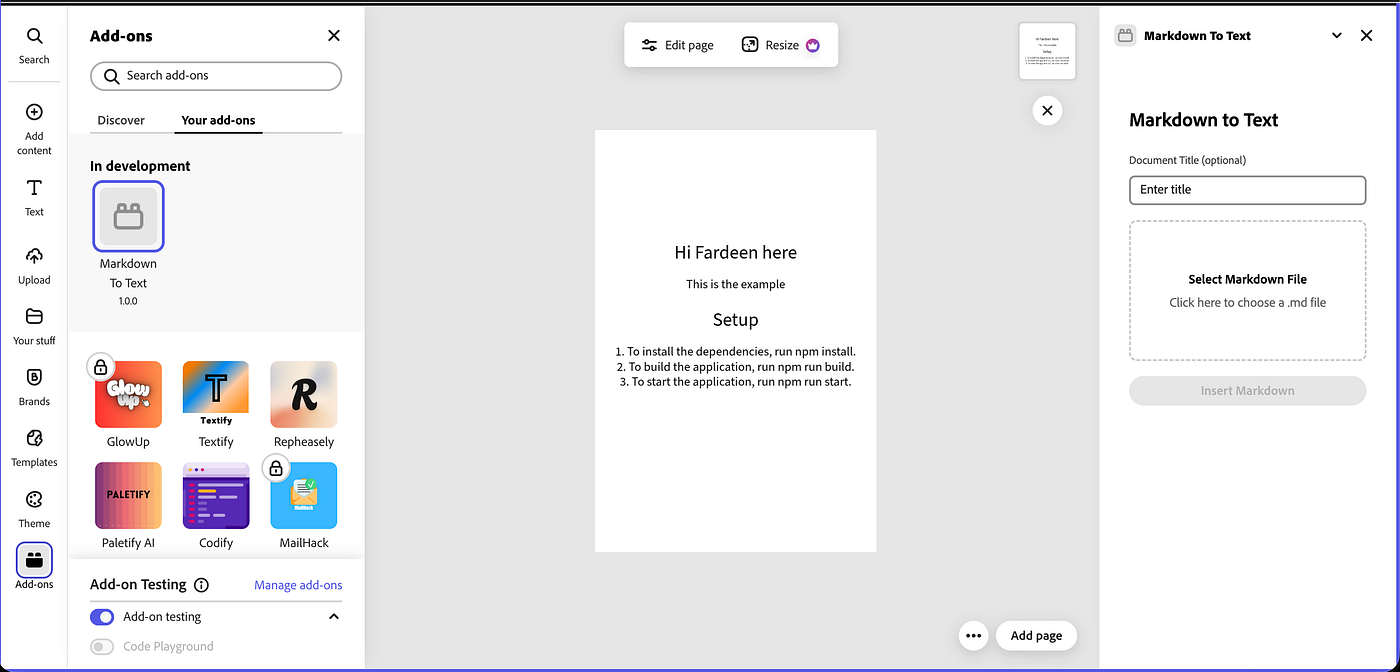
Step 3: Load Your Add-on in Adobe Express
1. Open new.express.adobe.com
2. Create or open a document
3. Click the Add-ons icon in the left rail

4. Enable “Add-On Testing”
5. Paste the local URL from your terminal

6. Your add-on panel will appear on the right side
Step 4: Understand the Project Structure
The template creates this structure:
src/
├── index.html # Entry point HTML
├── manifest.json # Add-on configuration
├── ui/
│ ├── index.jsx # React app entry (sets up SDK connection)
│ └── components/
│ └── App.jsx # Your main UI component
└── sandbox/
└── code.js # Document manipulation logic
Key concepts:
UI (iframe): Your React app runs here. This is where users interact.
Document Sandbox: Code that manipulates the Adobe Express document runs here.
Communication: The UI and Sandbox communicate via proxies using
runtime.apiProxy()andruntime.exposeApi().
The ui/index.jsx file handles the SDK initialization and passes the sandboxProxy to your App component as a prop.
Step 5: Install Additional Components
We’ll need these components. Install it:
npm install @swc-react/progress-circle @swc-react/field-label @swc-react/textfieldEnsure all @swc-react/* packages use the same version (check package.json).
Step 6: Build the UI
Open src/ui/components/App.jsx. Replace the default button example with this file upload interface:
import "@spectrum-web-components/theme/express/scale-medium.js";
import "@spectrum-web-components/theme/express/theme-light.js";

import { Button } from "@swc-react/button";
import { Theme } from "@swc-react/theme";
import { ProgressCircle } from "@swc-react/progress-circle";
import { FieldLabel } from "@swc-react/field-label";
import { Textfield } from "@swc-react/textfield";
import React, { useState, useCallback, useRef } from "react";
import "./App.css";

const App = ({ addOnUISdk, sandboxProxy }) => {
    const [file, setFile] = useState(null);
    const [fileContent, setFileContent] = useState(null);
    const [processing, setProcessing] = useState(false);
    const [title, setTitle] = useState("");

    const fileInputRef = useRef(null);

    const isMarkdownFile = (file) => {
        return (
            file.name.toLowerCase().endsWith(".md") ||
            file.type === "text/markdown"
        );
    };

    const handleFile = useCallback((selectedFile) => {
        if (!selectedFile) return;

        if (!isMarkdownFile(selectedFile)) {
            alert("Please select a Markdown (.md) file");
            return;
        }

        setFile(selectedFile);

        const reader = new FileReader();
        reader.onload = (e) => {
            setFileContent(e.target.result);
        };
        reader.onerror = () => {
            alert("Error reading file");
        };
        reader.readAsText(selectedFile);
    }, []);

    const handleFileSelect = useCallback((event) => {
        const selectedFile = event.target.files?.[0];
        handleFile(selectedFile);
    }, [handleFile]);

    const handleInsert = useCallback(async () => {
        if (!fileContent || !sandboxProxy) return;

        setProcessing(true);
        try {
            await sandboxProxy.insertMarkdownText(fileContent, title || null);
        } catch (error) {
            console.error("Error inserting markdown:", error);
            alert("Failed to insert markdown. Check console for details.");
        } finally {
            setProcessing(false);
        }
    }, [fileContent, title, sandboxProxy]);

    return (
        <Theme system="express" scale="medium" color="light">
            <div className="container">
                <h2>Markdown to Text</h2>

                <FieldLabel for="title-input">Document Title (optional)</FieldLabel>
                <Textfield
                    id="title-input"
                    placeholder="Enter title"
                    value={title}
                    onInput={(e) => setTitle(e.target.value)}
                    style={{ width: "100%", marginBottom: "16px" }}
                />

                <div
                    style={{
                        border: "2px dashed #ccc",
                        borderRadius: "8px",
                        padding: "24px",
                        textAlign: "center",
                        marginBottom: "16px",
                        cursor: "pointer",
                        backgroundColor: file ? "#f0f0f0" : "transparent",
                        minHeight: "100px",
                        display: "flex",
                        flexDirection: "column",
                        justifyContent: "center",
                        alignItems: "center"
                    }}
                    onClick={() => {
                        const fileInput = document.getElementById("file-input");
                        if (fileInput) {
                            fileInput.click();
                        }
                    }}
                >
                    {file ? (
                        <div>
                            <p style={{ fontWeight: "bold", marginBottom: "8px" }}>File Selected</p>
                            <p style={{ fontSize: "14px", color: "#666" }}>
                                {file.name}
                            </p>
                            <p style={{ fontSize: "12px", color: "#999", marginTop: "8px" }}>
                                Click to select a different file
                            </p>
                        </div>
                    ) : (
                        <div>
                            <p style={{ fontWeight: "bold", marginBottom: "8px" }}>Select Markdown File</p>
                            <p style={{ fontSize: "14px", color: "#666", marginTop: "8px" }}>
                                Click here to choose a .md file
                            </p>
                        </div>
                    )}
                    <input
                        ref={fileInputRef}
                        type="file"
                        id="file-input"
                        accept=".md,.markdown"
                        onChange={handleFileSelect}
                        style={{ display: "none" }}
                    />
                </div>

                <Button
                    variant="accent"
                    onClick={handleInsert}
                    disabled={!fileContent || processing}
                    style={{ width: "100%" }}
                >
                    {processing ? "Processing..." : "Insert Markdown"}
                </Button>

                {processing && (
                    <div style={{ marginTop: "16px", textAlign: "center" }}>
                        <ProgressCircle size="s" indeterminate />
                    </div>
                )}
            </div>
        </Theme>
    );
};

export default App;
This UI:
Allows users to select a Markdown file
Reads the file content using the FileReader API
Optionally accepts a document title
Calls the sandbox proxy to insert the content when the button is clicked
Step 7: Implement Document Sandbox Logic
Open src/sandbox/code.js. Replace the createRectangle function with markdown insertion logic:
import addOnSandboxSdk from "add-on-sdk-document-sandbox";
import { editor, constants } from "express-document-sdk";

const { runtime } = addOnSandboxSdk.instance;

function start() {
    const sandboxApi = {
        insertMarkdownText: (markdownText, title) => {
            // Parse simple markdown patterns
            const lines = markdownText.split(/\r?\n/);
            const insertionParent = editor.context.insertionParent;

            // Combine title and content
            let fullText = "";
            if (title) {
                fullText = title + "\n\n";
            }

            // Convert markdown to plain text (simple version)
            let plainText = fullText;
            for (const line of lines) {
                // Remove markdown syntax for basic formatting
                let processedLine = line
                    .replace(/^#{1,6}\s+/, "") // Remove heading markers
                    .replace(/\*\*(.+?)\*\*/g, "$1") // Remove bold markers
                    .replace(/\*(.+?)\*/g, "$1") // Remove italic markers
                    .replace(/`(.+?)`/g, "$1"); // Remove code markers

                if (processedLine.trim()) {
                    plainText += processedLine + "\n";
                } else {
                    plainText += "\n";
                }
            }

            // Create text node
            const textNode = editor.createText(plainText.trim());

            // Position text on the page
            textNode.setPositionInParent(
                { x: 50, y: 50 },
                { x: 0, y: 0 }
            );

            // Apply basic styling
            textNode.fullContent.applyCharacterStyles(
                { fontSize: 16 },
                { start: 0, length: textNode.fullContent.text.length }
            );

            // Style the title if present
            if (title) {
                const titleLength = title.length;
                textNode.fullContent.applyCharacterStyles(
                    { fontSize: 24, fontWeight: 700 },
                    { start: 0, length: titleLength }
                );
            }

            // Apply heading styles (lines starting with #)
            let currentOffset = title ? title.length + 2 : 0;
            for (const line of lines) {
                const match = line.match(/^(#{1,6})\s+(.+)$/);
                if (match) {
                    const level = match[1].length;
                    const headingText = match[2];
                    const fontSize = 28 - (level * 2);

                    textNode.fullContent.applyCharacterStyles(
                        { fontSize, fontWeight: 700 },
                        { start: currentOffset, length: headingText.length }
                    );
                    currentOffset += headingText.length + 1;
                } else if (line.trim()) {
                    currentOffset += line.length + 1;
                } else {
                    currentOffset += 1;
                }
            }

            // Add to document
            insertionParent.children.append(textNode);
        }
    };

    runtime.exposeApi(sandboxApi);
}

start();
This implementation:
Receives markdown text and optional title from the UI
Parses basic markdown patterns (headings, bold, italic)
Creates a text node in the document
Applies character styles for headings and titles
Inserts the text at position (50, 50) on the page
Step 8: Test Your Add-on
1. Save all files. The webpack dev server should auto-reload
2. In Adobe Express, refresh your add-on panel (or reload it)
3. Create or open a document
4. In the add-on panel:
Optionally enter a title
Select a
.mdfileClick “Insert Markdown”
5. The styled text should appear in your document
Understanding How It Works
UI to Sandbox Communication:
ui/index.jsxwaits for the SDK to be ready, gets asandboxProxy, and passes it toAppApp.jsxcallssandboxProxy.insertMarkdownText()When the user clicks the buttonThe sandbox receives this call and executes document manipulation code
Document API Basics:
editor.createText()creates a new text nodetextNode.setPositionInParent()positions it on the pagetextNode.fullContent.applyCharacterStyles()applies formatting to text rangesinsertionParent.children.append()adds the node to the document
File Handling:
The UI uses the browser’s
FileReaderAPI to read file contentsFile reading happens in the UI (iframe), not in the sandbox
Only the text content is passed to the sandbox
Next Steps
Now that you have a working add-on, you can extend it:
1. Enhanced Markdown Parsing: Add support for lists, links, and code blocks
2. Better Styling: Use fonts from the Document API (`fonts.fromPostscriptName()`)
3. Paragraph Styles: Apply paragraph-level formatting for lists and spacing
4. Error Handling: Add better user feedback for errors
5. Multiple Formats: Support exporting or importing other file types
Key Takeaways
UI handles user interaction: File selection, forms, buttons — all in React
Sandbox handles document manipulation: Creating nodes, applying styles, positioning
Communication is async: Always
awaitsandbox proxy callsFile reading happens in UI: Use the FileReader API before sending to the sandbox
Text API is powerful: You can style specific character ranges and paragraphs
You now have the foundation to build your own Adobe Express add-ons. Explore the Document API reference to discover more capabilities.
See you in the next one!!!
Follow me on x dot com: https://x.com/fardeentwt
See all my Add-Ons here: https://addon.fardeen.me/
How to Build a Adobe Express Add-On?
So you want to build an Adobe Express add-on. This is how you do it. We’ll make an AI color palette generator that takes prompts and creates color schemes. Nothing fancy, just the basics.
What We’re Building
An add-on where users type something like “sunset colors” and get AI-generated palettes they can add to their Express projects. Basic stuff.
Prerequisites
You need these things:
Node.js (version 18 or newer) — get it from nodejs.org
An Adobe account — use your existing one or make a free one
Basic React and TypeScript knowledge (cuz we’re going to use react-typescript template), just the basics
A text editor, VS Code, Cursor works fine
Step 1: Setting Up Your Project
Create your add-on project with this command:
npx @adobe/create-ccweb-add-on color-ai-addon - template react-typescript-with-document-sandboxThis creates a new folder with all the files you need. It includes document sandbox support so you can actually add things to the Express document.
Navigate into your project:
cd color-ai-addonStep 2: Understanding the Project Structure
Here’s what gets created:
color-ai-addon/
 ├── package.json - project config
 ├── webpack.config.js - build settings
 ├── tsconfig.json - TypeScript config
 ├── src/
 │ ├── index.html - main UI file
 │ ├── manifest.json - add-on metadata
 │ ├── components/
 │ │ └── App.tsx - main React component
 │ └── sandbox/
 │ └── code.js - document manipulation logicb
Adobe Express add-ons have two main parts:
UI part (React components) — what users see and interact with
Sandbox part — where you actually add stuff to the document
Step 3: How Add-Ons Work
Adobe Express add-ons have two main parts that talk to each other.
UI part (React components):
This is what users see and click on.
Runs in an iframe inside Express.
Uses React with TypeScript for the interface.
Handles user interactions like buttons and forms.
Sandbox part (document manipulation):
This is where you actually change the Express document.
Runs in a separate context for security.
Can create shapes, text, colors, etc.
Communicates with the UI part through a proxy.
The two parts talk to each other using the Add-On SDK. The UI sends messages to the sandbox when users do things, and the sandbox does the actual work.
Step 4: React TypeScript Setup
The React-TypeScript template gives you:
React 18 — for building the UI
TypeScript — for type safety
Webpack — for bundling everything
Spectrum Web Components — for UI that looks like Adobe Express
Hot reload — so changes show up immediately
You get a basic App.tsx component that you can modify. It already has the Add-On SDK set up and ready to use.
Step 5: Spectrum Web Components
Adobe uses Spectrum Web Components for the UI. These are web components that look like native Adobe Express elements. You can use them in React with the @swc-react packages.
Common components you’ll use:
Button — for clickable buttons
TextField — for text input
Theme — wraps everything to look like Express
ProgressCircle — for loading states
Step 6: Document Sandbox APIs
The sandbox part has access to the Express document APIs. You can:
Create shapes (rectangles, circles, etc.)
Add text with different fonts and styles
Change colors and fills
Group elements together
Position things on the artboard
The main APIs you’ll use:
editor.createRectangle()— makes a rectangleeditor.createText()— makes textcolorUtils.fromHex()— converts hex colors (imported separately from “express-document-sdk”)editor.context.insertionParent— gets where to add things
Import pattern:
import { editor, colorUtils } from "express-document-sdk";Step 7: Communication Between UI and Sandbox
The UI and sandbox talk through a proxy system:
UI calls sandboxProxy.someFunction()
This sends a message to the sandbox
Sandbox runs the function and returns data
UI gets the result and updates the interface
This is how you get user input from the UI and then actually add things to the Express document.
For external API calls:
The sandbox cannot make network requests directly. You need to:
Make the API call from the UI iframe (where fetch is available).
Expose a function from the UI that handles the API call.
Call that function from the sandbox through the communication API.
Pass the results back to the sandbox.
Step 8: Building and Testing
To build your add-on:
npm run build
npm run start
This creates a local server https://localhost:5241 where you can test your add-on.
Step 9: Loading in Adobe Express
To test your add-on:
Go to adobe express (https://new.express.adobe.com)
Enable developer mode in settings

3. Create a new project
4. Go to the Add-Ons panel
5. Enable “Add-On Testing”

6. Enter your local server URL
7. Click your add-on to run it
Step 10: How the Color Palette Add-On Works
For our color palette generator:
User types a prompt in the UI.
UI calls the Gemini API to generate colors.
UI sends the colors to the sandbox.
UI shows the color swatches.
When the user clicks “Add to Document”, the UI tells the sandbox to create rectangles with those colors.
Sandbox creates the rectangles and adds them to the Express document.
Important note: The document sandbox has limited web APIs and cannot make external network requests like calling APIs. External calls must be made from the UI iframe and the results passed to the sandbox through the communication API.
Common Issues
Add-on won’t load:
Check that your local server is running.
Look at the browser console for errors.
Make sure manifest.json is valid.
API calls fail:
Check your API keys.
Look at the network tab for failed requests.
Make sure you’re handling errors properly.
Things don’t appear in the document:
Make sure you’re in a project with an artboard.
Check the sandbox console for errors.
Verify you’re calling the right APIs.
What You Learned
You now know:
How Adobe Express add-ons are structured.
The difference between UI and sandbox parts.
How to use React and TypeScript for add-ons.
How to communicate between UI and the sandbox.
How to add things to Express documents.
How to test add-ons locally.
This is the basic structure for any Adobe Express add-on. You can build whatever you want using these same patterns.
If you guys want, I can also come up with a blog where we will deep dive into how to actually write Add-On code, this blog was just for you to get introduced with how Add-On works.
See you in the next one!!
Follow me on x dot com: https://x.com/fardeentwt
Setting Up Prisma (Latest Approach)
I previously wrote a blog on how to set up Prisma and learn its basics. The old guide still works if you want to understand Prisma fundamentals, but the setup process has changed quite a bit since then.
If you still want to check out that older guide, you can read it here: https://fardeen.tech/blogs/cm7ewul930000gs9o85b6ml42
Now, let’s walk through the new, up-to-date way of setting up Prisma in your project, including Prisma Accelerate for faster queries and an optional Prisma Postgres instance.
1. Install Prisma CLI and tsx.
npm install prisma tsx --save-dev2. Install Prisma Client & Accelerate Extension.
npm install @prisma/extension-accelerate @prisma/client3. Initialize Prisma in your project.
Now some changes here:
1. --output ../app/generated/prisma : allow us to define the path for the converted database schema.
2. --db : if you also want to get a postgres database instance from prisma, this flag allows you to initialize a database instance and put the database url to .env file automatically.
npx prisma init --db --output ../app/generated/prismaIf you’re not using Prisma Postgres, you can skip the
--dbflag and manually update your.envfile with your own database connection string.
4. Define database schema
In your schema.prisma file define the your schema.
model User {
  id        Int      @id @default(autoincrement())
  email     String   @unique
  name      String?
  createdAt DateTime @default(now())
  updatedAt DateTime @updatedAt
}
Also, when using Accelerate in production, your datasource block should have both DATABASE_URL and DIRECT_URL
datasource db {
  provider  = "postgresql"
  url       = env("DATABASE_URL") // accelerate-optimized url
  directUrl = env("DIRECT_URL")   // direct db url for migrations
}
5. Migrate the database.
npx prisma migrate dev --name init6. Generate Prisma Client (Accelerate-Friendly)
When using Accelerate, you can skip the local query engine binary in production:
npx prisma generate --no-engine7. Create an prisma singleton file
create an lib/prisma.ts file and put this code in it:
import { PrismaClient } from '../app/generated/prisma'
import { withAccelerate } from '@prisma/extension-accelerate'

const globalForPrisma = global as unknown as {
    prisma: PrismaClient
}

const prisma = globalForPrisma.prisma || new PrismaClient().$extends(withAccelerate())

if (process.env.NODE_ENV !== 'production') globalForPrisma.prisma = prisma

export default prisma;
8. Import the prisma in your app
import prisma from "@lib/prisma"

export default function App() {
	const fetchUser = async () => {
		const user = await prisma.user.findMany();
		return user;
	}

	return ()
}
- Summary of changes from old setup
--dbflag can now provision a Prisma-hosted Postgres database automatically.--outputlets you customize Prisma Client location.Added
directUrlinschema.prismafor migrations.Use
--no-enginewhen generating Prisma Client with Accelerate.Updated singleton import to use
@prisma/clientdirectly.Clarified local vs production Accelerate behavior.
Hope this blog will help you, see you in the next one till than kepp making memes using memehub dot mom.
@fardeentwt
what forcing me to work hard every day?
so the past few months, i’ve been grinding every day. i wouldn’t say my ass off, but i’m working decently hard. and there’s only one thing that motivates me to wake up every day, sit in a chair, put my head down, and just work on my skills.
honestly, i don’t even need to work this hard if i just want to live a decent life. we already have a settled family business that earns us enough to live comfortably. but here’s the thing: my father worked really hard to build that business, and he's still working hard.
if i wanted, i have enough skills to get a minimum 25k/month entry-level job in my hometown. that’s a comfortable start. but i don’t want to live an ordinary life.
the reason i work every day is because i want to retire my parents. i want them to be able to buy whatever they want, without me needing to think twice about the price. that’s the only goal i have. the only goal i’m working for. i don’t care if i become a millionaire or billionaire, i just want that level of freedom.
since childhood, i’ve been very close to my parents. so i can’t just ignore them for the sake of chasing money. i want them to explore the world without having to worry about anything.
to be honest, i don’t even want money for myself, because i don’t have the habit of spending. i can survive on as little as possible. even if i earn just 10k a month in my hometown, i’d be fine.
but ever since i was a kid, i’ve wanted to buy crazy stuff, machine parts, electronic items, all those things an engineer dreams of tinkering with. but those things cost money. so i’ve been ignoring those dreams for now. once i become capable enough, though, i’ll definitely buy them all and try to become a low-budget tony stark (sasta iron man).
i think a lot of people can relate to this. it’s not a unique dream to make your parents happy and live your life your way. that’s something almost everyone craves.
now, let me try to estimate how much i’d need to make per month to make all this happen. i’d say ₹10 lakhs per month is a good number. with that, i could achieve all of this here in india.
even if i earn ₹50k, my parents would still be happy, lol.
i’d also suggest this: if you don’t already have a strong motivating factor in your life, find one. it can be anything, like “i want to earn x amount per month,” “i want to give my parents a world tour,” or “i want to retire at 35.”
but make sure it’s not some short-term hype you get from a motivational video. it should be something that sticks in your heart, something that makes you feel guilty when you waste time.
in my case, this goal is embedded deep in my heart. i don’t need to think about it constantly; it’s in my subconscious now. it’s become part of my identity.
if i talk about the timeline for achieving this, i genuinely believe i can land a $120k offer in the next 6–12 months (not kidding).
and if you ask when i want to achieve all this, i want to do it before i turn 25. that gives me 5 years.
i know some of you might be thinking, “haha, how small are this blud's goals?”
well, let me tell you, this is my first priority: to give my parents what they deserve. and once i achieve that, i won’t stop there. my next goal will be even bigger.
this is just the first step toward making my parents proud. i never bind myself to one goal. i truly believe a human can achieve anything they want in this world, and the only thing stopping them is themselves.
so i’m ending this with:
“do whatever the fuck you want. don’t bind yourself to anything. you’re capable enough to get shit done.”
thanks for reading dawgs, see ya in the next one.
how to get out of tutorial hell?
first we understand what exactly is tutorial hell.
so when you know some basic stuff, for example basic mern stack (most fall in this category), and u’ve built some basic project by watching some tutorials while learning, but when u start to build something from scratch by ur own without a tutorial, you get absolutely blank and you don’t have any idea what to do next.
i know this is a very bad phase when you want to build something but can’t because you don’t have a clue how to proceed step by step, and sometimes this also means u have “skill issues” dawg.
now let’s talk about how i really got out of it and how you can also do the same.
how i got out of tutorial hell
when i learned the basic mern development, i’ve built some basic projects along the way. but one day, when i sat to build a project that i genuinely wanted to build, then i realized that i knew nothing.
you won’t believe, i didn’t even know how to connect a react frontend with the express backend. i was that cooked. but one day i decided that i need to break all this, and i will build a mid-level complexity project on my own, no matter what.
so i decided to build the salon management project, which includes:
payment integration
admin dashboard
notifications
booking functionality
etc etc
so how did i manage to build this without that much knowledge?
here comes the “FAFO” thing, i figured out the things along the way using docs, llm, and stack overflow. i learned things that i didn’t have any idea of. and please don’t be shy to google or ask things to llm. you think you are choosing the shortcut by using them, but it is the only way to learn things 100x faster.
by using llm i don’t mean generating the full code from it, but asking doubts that come along the way, for e.g., “which payment integration to use: stripe or razorpay?”
so through “FAFO”, i completely built and deployed that project. and literally, i didn’t need to watch any tutorial again to build anything, i became self-independent. so this is how i overcame tutorial hell. now let’s talk about how you can overcome it.
how can you get out of tutorial hell
if you want a one-line answer to it? then it will be: “FUCK AROUND AND FIND OUT”
this is the only way. but let’s discuss it in detail.
blind coding technique
i heard about this technique from kirat, and it is pretty straightforward, but this may break ur patience.
what do you do in this technique?
you pick a project tutorial, and you build that whole project by watching it.
after building that, next time you try to build that same project again from scratch, and this time you don’t follow that tutorial.
if you can build it, then it’s good. but if you get stuck in the middle or can’t even start, then you again watch that tutorial and build that project from scratch again.
and you will repeat this cycle until you finally build it without watching the tutorial, by urself.
honestly, i don’t like this technique that much as it is very time-taking and requires patience.
how i would do it again
if i became a beginner again (i’m still a beginner tho), i would follow this:
pick a project
learn the techs that u’ll need to build that (docs, llm)
ask llm how you can start, where to start, how to do this (theory)
start assembling the things
if stuck, first go for → stack overflow → docs → llm
just FAFO, bro
so this was my experience and my observation, i shared what worked for me. and after all this, if you still can’t build by your own, then you are ngmi. please leave tech bro and start farming.
good luck dawgs, see you in the next one.
btw you guys can follow me on:
x dot com: https://x.com/fardeentwt
medium: https://medium.com/@fardeenmansuri0316
stop deleting apps. fix your brain.
ok so maybe this won’t sit right with everyone, but i’m just sharing what i think.
i’ve seen a lot of people delete social media to escape doomscrolling and get their focus back. like deactivating insta before exams because they want to “lock in.” fair enough.
but honestly? deleting the app isn’t the solution. it’s just a temporary patch.
you’re not fixing your addiction, you’re just dodging it.
and most of the time, people just replace one app with another. they delete insta, then end up scrolling twitter or linkedin (💀). so what changed? nothing really.
the real issue is not the app. it’s your inability to control your urge to open it every 5 minutes. and until you fix that, it doesn’t matter how many apps you delete, you’ll always find something else to waste time on.
the only actual solution is self-control.
you have to know how to say “no” to yourself. that’s it. no shortcuts.
if you’re addicted to reels, porn, whatever it all comes down to whether you can hold yourself back. not by force-deleting stuff, but by learning to delay gratification and use shit when you actually want to, not when your brain's just bored.
let me give you my example.
back in 12th grade, i was deep in the reel addiction cycle.
wake up -> scroll reels
sleep -> scroll reels
screen time: 12+ hours a day lol
exams were around the corner and i wasn’t even close to ready. attention span was gone. i was cooked. so i tried something different.
i set small goals, like finish one chapter, then 15–30 mins on my phone [ yeh ik i'm retard at that time (i'm still tho) ]. kinda like pomodoro, but based on tasks instead of timers.
it worked. i scored around 90% that year.
but still, i hadn’t really solved the root problem. i was just managing it.
now? i use social apps only when i feel like it. they don’t control me anymore.
i open instagram for memes and sometimes to see what’s going on in the world (memes are literally better news sources now).
i use it around 30 mins a day, max and i've no guilt about it.
i use twitter during breaks between tasks, like while a server boots up or something. i don’t scroll aimlessly. i post, check notifs, close the app (i mostly use twitter on browser btw).
why?
because this shit doesn’t give me dopamine anymore.
from the day i started (actually started around aug 24), learning and building things i don't need to get dopamine from these things anymore, i get my daily dose of dopamine by building and learning something new.
so yeah
stop blaming apps.
start fixing your attention.
learn how to control your own brain.
once you do that, you won’t get addicted to anything, not even porn.
see ya in the next one :)
i’m not disciplined yet. but i’m trying
so this is going to be my first blog where i'm gonna share my raw thoughts.
so the problem with me is i can't be able to disciplined for a long time, by long time i mean days, not hours. the weird thing with me is that i easily get involved in work that is not adding value to my life. some of the things are:
building a fun project that's not gonna help me with anything
searching for something for hours
nowadays I'm brainstorming the ideas for the grant and a hackathon, so it consumes a good amount of time to research
start building the project without validating the idea (memehub was created just like that)
wasting too much time in the toilet, just overthinking (my real followers know the reason)
sometimes I waste a good amount of time just to post a tweet (I feel really bad after it)
i don't ever follow a routine like some other people do (waking up at 6 am, doing this by this time blah), i've tried making a routine, but it doesn't work for me.
so what i do is i write down my tasks that i have to do either in the night or early in the morning, and bcs of this i don't get distracted easily, but still sometimes, bcs of the factors i mentioned, i got distracted.
in the summer, i get highly distracted, until i don't get a bath, i am unable to focus on my work. and the ac and the cooler don't work for me, i start to feel tired in both of them after some time.
i think i got distracted from the topic, sometimes i literally waste whole days but on the twitter i never share that and i think everyone shares only their w's not how their everyday life looks like (it's also a reason i started sharing my raw thoughts so that you guys can get to know more about me).
the main reason how i wasted the whole day is mostly the nap. like i heard, people feel very fresh after taking a nap but that's not the case with me, when i take a nap and wake up (don't matter how many hours of sleep) i always feel tired and i feel my head hurts heavily and my eyes start to burn.
and one thing more, whenever there is an rcb match i can't stop myself from watching the match. like i'm watching the cricket from a long time now (10 years approx) and also i was a professional cricketer for around 2-3 years (i forget the exact time and there is a reason behind it tho) so whenever there is an rcb match then my productivity at that time goes very low, i still do work in that time while watching the match but i don't do the focused work in that period. i fully ignore the other teams' matches, tho.
if you are here still reading it i know it is not making any sense to you bcs i'm distracting from the topic a lot.
so the thing is i always try to avoid the things that i know can make me waste my whole days and distract me, like at this date i'm writing the blog is also a wasted day for me, i haven't done any good work, i just fixed an add-on that was broken, created an image to text extractor web application for fun, added two new templates to memehub, brainstormed an idea for a hackathon and next grant project (this took a lot of time), written this blog lol
so i put this day in a wasted day category as i was also supposed to clear my devops backlog, learn figma, solve cf questions, and more.
but tomorrow will gonna be a productive day again after this off day.
so this was all thing, if you have read this shit till now then thanks, i know it does not make any sense but i will get better after every other blog so bear with me.
next time, i will come with a good topic and a good format and structure.
good by anon :)
Prisma for Beginners: Setting Up, Migrating, and Querying Data
Getting Started with Prisma
Prisma is a modern database toolkit that simplifies database access in Node.js and TypeScript applications. It provides an intuitive ORM (Object-Relational Mapping) that allows us to define schemas, run migrations, and query databases efficiently. In this guide, we’ll be using Prisma with Next.js as an example.
1. Install Prisma
First, install Prisma as a development dependency:
npm install prisma --save-dev2. Initialize Prisma
Initialize a Prisma folder and create a schema.prisma file by running:
npx prisma init3. Set Up a PostgreSQL Database
For a side project, you can get a free PostgreSQL database from Neon.
Sign up at neon.tech.
Create a new project and get the
DATABASE_URL.Replace the default
DATABASE_URLin the.envfile with your Neon database URL.
DATABASE_URL="your_neon_database_url_here"4. Define a Model
After initializing Prisma, define a table (model) inside the schema.prisma file. Here’s an example:
model User {
  id       Int       @id @default(autoincrement())
  email    String    @unique
  name     String?
  profile  Profile?
}
5. Migrate the Schema
Once the schema is defined, the next step is to migrate it to the database. This converts the schema into SQL queries and executes them to create the actual tables in the database.
npx prisma migrate dev --name init6. Generate the Prisma Client
After migrating, you need to interact with the database in your application. Prisma provides a client to connect with your database and perform queries. Generate the Prisma client by running:
npx prisma generate7. Using the Prisma Client
Now, you can import and use the Prisma client in your application:
import { PrismaClient } from '@prisma/client';
const prisma = new PrismaClient();
Example: Creating a User
Here’s an example of how you can use Prisma to create a new user:
import { PrismaClient } from '@prisma/client';
const prisma = new PrismaClient();

async function main() {
  const user = await prisma.user.create({
    data: {
      name: 'John Doe',
      email: 'john@example.com'
    },
  });
  console.log(user);
}

main();
This is a high-level example of how to set up Prisma in your project.
Making Schema Changes
Let’s say you want to add a new field age to the User table. First, update your model in schema.prisma:
model User {
  id       Int       @id @default(autoincrement())
  email    String    @unique
  name     String?
  profile  Profile?
  age      Int
}
Then, migrate these changes to the database so they reflect in your tables:
npx prisma migrate dev --name added-age
# (For production, use: "npx prisma migrate deploy")
It’s also a good practice to regenerate the Prisma client after making schema changes:
npx prisma generateRelationships in Prisma
1. One-to-One Relationship
model User {
  id      Int     @id @default(autoincrement())
  profile Profile
}

model Profile {
  id     Int  @id @default(autoincrement())
  userId Int  @unique
  user   User @relation(fields: [userId], references: [id])
}
A User can have one Profile, and a Profile must belong to one User. The userId in Profile links it to the User. The @unique constraint ensures each user has only one profile.
2. One-to-Many Relationship
model User {
  id    Int    @id @default(autoincrement())
  posts Post[]
}

model Post {
  id     Int  @id @default(autoincrement())
  userId Int
  user   User @relation(fields: [userId], references: [id])
}
A User can have multiple Posts, and each Post belongs to one User. The userId in Post establishes this relationship, while the posts field in User is an array, allowing multiple posts per user.
3. Many-to-Many Relationship (Implicit)
model Post {
  id    Int    @id @default(autoincrement())
  tags  Tag[]
}

model Tag {
  id    Int    @id @default(autoincrement())
  posts Post[]
}
A Post can have multiple Tags, and a Tag can belong to multiple Posts. Prisma automatically creates a join table to manage this relationship, so you don’t need to define it manually.
Querying Data
1. Fetching All Users
const users = await prisma.user.findMany();This retrieves all users from the database.
2. Fetching a User by ID
const user = await prisma.user.findUnique({
  where: {
    id: 1
  }
});
This fetches the user with id = 1.
3. Updating a User
const updatedUser = await prisma.user.update({
  where: {
    id: 1
  },
  data: {
    name: 'Jane Doe'
  },
});
This updates the user’s name to Jane Doe.
4. Deleting a User
await prisma.user.delete({
  where: {
    id: 1
  }
});
This deletes the user with id = 1 from the database.
This guide provides a basic overview of getting started with Prisma, setting up models, handling migrations, defining relationships, and querying data. You can now integrate Prisma into your projects to simplify database management!
Keep Building, Anon!
How to Setup Redux With Next.js Easily
We are supposed to create an counter application using Redux.
Create a new Next.js project:
npx create-next-app@latestInstall the Redux Toolkit and React-Redux:
npm install @reduxjs/toolkit react-reduxConfiguring the Redux Store
Create a
/storefolder in thesrcdirectory.Inside the
/storefolder, create astore.tsfile with the following code:
// store/store.ts
import { counterSlice } from '@/features/counter/counterSlice';
import { configureStore } from '@reduxjs/toolkit';

export const store = configureStore({
    reducer: {
        counter: counterSlice.reducer
    },
});

export type RootState = ReturnType<typeof store.getState>;
export type AppDispatch = typeof store.dispatch;
Wrapping Components with the Store Provider
To use the Redux store in your components, wrap them with a store provider. Create a new file in the /store folder named StoreProvider.tsx:
"use client";

import { store } from './store';
import { Provider } from 'react-redux';

export default function StoreProvider({ children }: { children: React.ReactNode }) {
    return (
        <Provider store={store}>
            {children}
        </Provider>
    );
}
Creating a Reducer (Slice)
Reducers handle state updates in Redux. To organize your code, create separate reducers if you have different global states. For example:
Counter state:
src/features/counter/counterSlice.tsTodo state:
src/features/todo/todoSlice.ts
Counter Slice Example
btw you can also create this reducer in /store folder but if you want to follow best practices then create an folder structure like this src/features/counter/counterSlice.ts In the counterSlice.ts file we will create our counter reducer.
import { createSlice } from '@reduxjs/toolkit';
import type { PayloadAction } from '@reduxjs/toolkit';

export interface CounterState {
    value: number;
}

const initialState: CounterState = {
    value: 0,
};

export const counterSlice = createSlice({
    name: 'counter',
    initialState,
    reducers: {
        increment: (state) => {
            state.value += 1;
        },
        decrement: (state) => {
            state.value -= 1;
        },
        incrementByAmount: (state, action: PayloadAction<number>) => {
            state.value += action.payload;
        },
    },
});

export const { increment, decrement, incrementByAmount } = counterSlice.actions;
export default counterSlice;
Key Concepts
Slice: A slice represents a piece of the Redux state and includes the state, reducers, and actions related to that piece.
Reducers: Functions that specify how the state changes in response to actions.
Actions: Plain JavaScript objects that describe what to do (e.g., increment or decrement the counter).
State: A central object holding all the application data that can be shared across components.
Using Redux in Components
To interact with Redux in your components, use the useSelector and useDispatch hooks from react-redux.
Counter Component Example
"use client";

import { decrement, increment } from '@/features/counter/counterSlice';
import { useDispatch, useSelector } from 'react-redux';
import { RootState } from '@/store/store';

export default function Home() {
  const count = useSelector((state: RootState) => state.counter.value);
  const dispatch = useDispatch();

  return (
    <div className="grid items-center justify-items-center min-h-screen p-8 pb-20">
      <div>
        <button
          aria-label="Increment value"
          onClick={() => dispatch(increment())}
        >
          Increment
        </button>
        <span>{count}</span>
        <button
          aria-label="Decrement value"
          onClick={() => dispatch(decrement())}
        >
          Decrement
        </button>
      </div>
    </div>
  );
}
Let’s go now your counter application is completed and you will see it’s working fine.
This simple example demonstrates how to set up Redux, manage state, and interact with it in your components. You can extend this setup for more complex state management needs in your application.
How to Make Your First Pull Request
Making your first pull request can feel a little intimidating, but it’s actually quite straightforward once you get the hang of it. Here’s a step-by-step guide to help you through the process:
Step 1: Fork the Repository
The first step is to create your own copy of the repository you want to contribute to. This is called "forking."
Go to the GitHub page of the repository e.g.
code100x/cms.Click the Fork button in the top-right corner.
Now you have your own version of the repository under your GitHub account.
Step 2: Clone the Repository
Next, you need to download your forked repository to your local machine so you can work on it.
Run the following command in your terminal:
git clone https://github.com/<your-username>/<repository-name>.gitReplace <your-username> with your GitHub username and <repository-name> with the name of the repository you forked.
Step 3: Create a New Branch
Before making changes, it’s best practice to create a new branch. This keeps your main branch clean and organized.
Run this command:
git checkout -b <branch-name>Replace <branch-name> with a meaningful name related to the changes you plan to make, like fix-typo or add-new-feature.
Step 4: Set Up the Project Locally
Follow any instructions in the repository's README.md or CONTRIBUTING.md file to set up the project on your local environment. This might include installing dependencies or configuring certain files.
For example, if it’s a Node.js, React or Next.js project, you might need to run (if using npm as package manager):
npm installStep 5: Make Your Changes
Now you’re ready to make your changes. Open the project in your favorite code editor (btw I use cursor) and start working on it.
Once you’re done:
Stage your changes:
git add .Commit your changes with a descriptive message:
git commit -m "fix: NASA codebase"
Step 6: Push Your Changes
Push your changes to the new branch you created earlier:
git push origin <branch-name>Replace <branch-name> with the name of your branch.
Step 7: Open a Pull Request
Now it’s time to submit your changes for review.
Go to your forked repository on GitHub.
Click the Pull Request button.
Select the branch you just pushed from your forked repository.
Choose the branch you want to merge into on the original repository.
Add a clear and descriptive title and description for your pull request. Mention what changes you made and why.
For example:
Title: Fix Typo in README
Description: This pull request fixes a typo in the README file. The word "anonymous" was corrected to "anons"
Step 8: Submit Your Pull Request
Once you’ve filled out the title and description, click Create Pull Request.
Congratulations! 🎉 You’ve just made your first pull request. Now, the repository maintainers will review your changes. If they have any feedback, they might ask you to make some updates before merging your pull request.
Final Tips
Be patient and polite when waiting for feedback.
Follow the repository's contribution guidelines if they have any.
Don’t hesitate to ask questions if you’re unsure about something.
Making your first pull request is an important milestone. Good luck, and happy coding!
How to Install Docker on Ubuntu: A Step-by-Step Guide
Introduction
Docker is an open-source platform that enables developers to automate the deployment of applications inside lightweight, portable containers. These containers package software with all its dependencies, ensuring consistent performance across different environments. Whether you're building, shipping, or running applications, Docker streamlines the process.
This guide walks you through the process of installing Docker on an Ubuntu system, ensuring a smooth and efficient setup.
Prerequisites for Installing Docker
Before diving into the installation process, ensure your system meets the following prerequisites:
Operating System: A supported version of Ubuntu (e.g., 20.04, 22.04).
User Permissions: Administrative (sudo) access.
Internet Access: Required to download packages and dependencies.
These prerequisites ensure a seamless installation process.
Installing Docker on Ubuntu
Follow the step-by-step instructions below to install Docker on your Ubuntu system. This section includes updating your package manager, adding Docker's GPG key, setting up the repository, and finally installing Docker.
Update Package Information:
First, update the package list and install necessary packages for Docker's repository setup.
sudo apt update
sudo apt install -y apt-transport-https ca-certificates curl software-properties-common
Add Docker’s Official GPG Key:
This key is used to verify the authenticity of the Docker packages.
curl -fsSL https://download.docker.com/linux/ubuntu/gpg | sudo gpg --dearmor -o /usr/share/keyrings/docker-archive-keyring.gpgAdd Docker Repository:
Add the Docker repository to your system's package sources.
echo "deb [arch=amd64 signed-by=/usr/share/keyrings/docker-archive-keyring.gpg] https://download.docker.com/linux/ubuntu $(lsb_release -cs) stable" | sudo tee /etc/apt/sources.list.d/docker.list > /dev/nullInstall Docker:
Update the package list again and install Docker.
sudo apt update
sudo apt install -y docker-ce docker-ce-cli containerd.io
Start Docker and Enable it on Boot:
Start the Docker service and ensure it starts on boot.
sudo systemctl start docker
sudo systemctl enable docker
Verify Docker Installation:
Check that Docker is installed correctly by running the hello-world image.
sudo docker run hello-worldConclusion
Installing Docker on Ubuntu is straightforward when you follow the right steps. With Docker installed, you can begin exploring its vast ecosystem and benefits. Whether you're a developer, sysadmin, or enthusiast, Docker empowers you to build, deploy, and manage applications with ease.
Start your Docker journey today and unlock the full potential of containerization!
Understanding Human Psychology: An Overview
Human psychology is a fascinating field that delves into the intricacies of the human mind and behavior. By studying psychological principles, we gain insights into how individuals think, feel, and act. This blog post aims to explore some key concepts and theories in psychology, highlighting their relevance to our daily lives.
Key Concepts in Human Psychology
Cognitive Dissonance
Cognitive dissonance is a psychological phenomenon where an individual experiences discomfort due to holding conflicting beliefs or values. This often leads to a change in attitude or behavior to reduce the discomfort.Behaviorism
Behaviorism focuses on observable behaviors and the ways they are learned through interaction with the environment. Key figures in this field include:B.F. Skinner: Known for his work on operant conditioning.
John B. Watson: Promoted the idea that psychology should be the study of observable behavior.
Maslow's Hierarchy of Needs
This theory categorizes human needs into a five-tier model, often depicted as a pyramid:Physiological Needs: Basic survival needs such as food and shelter.
Safety Needs: Security and protection from harm.
Love and Belongingness: Emotional relationships and social connections.
Esteem Needs: Recognition and self-esteem.
Self-Actualization: Realizing personal potential and self-fulfillment.
The Importance of Psychological Research
Psychological research is crucial for understanding human behavior and mental processes. It helps in:
Developing therapies: Effective treatment methods for mental health issues.
Enhancing education: Improving teaching methods and learning outcomes.
Guiding public policy: Informed decisions in areas like health and education.
Practical Applications of Psychology
Understanding psychology can lead to better personal and professional relationships. Here are some practical applications:
Conflict Resolution: Applying negotiation strategies and understanding emotional intelligence.
Improving Communication: Using active listening techniques to enhance interpersonal skills.
Stress Management: Implementing relaxation techniques and cognitive-behavioral strategies.
Conclusion
In conclusion, human psychology offers valuable insights into the complexities of our minds and behaviors. By studying psychological principles, we can improve our understanding of ourselves and others, leading to a more fulfilling and harmonious life.
Top 5 Lessons from the Steve Jobs Biography
Steve Jobs, the co-founder of Apple Inc., is a figure who has left an indelible mark on technology and business. His biography, penned by Walter Isaacson, provides an in-depth look at his life, his vision, and the principles that guided him. Here are the top five lessons we can learn from Jobs’ extraordinary journey.
1. Passion Drives Success
One of the most profound lessons from Jobs' life is the importance of passion. Jobs believed that to excel in any field, you must genuinely love what you do. His enthusiasm for technology and design was evident from his early days at Apple. This passion fueled his relentless pursuit of excellence and innovation, leading to groundbreaking products like the iPhone and iPad. For aspiring entrepreneurs and professionals, this underscores the value of finding work that ignites your passion; it’s often the key to success and fulfillment.
2. Embrace Failure and Learn from It
Jobs faced numerous setbacks throughout his career, including being ousted from Apple in 1985. Rather than letting this failure define him, he used it as an opportunity for growth. During his time away from Apple, he founded NeXT and acquired Pixar, both of which taught him invaluable lessons that he later applied when he returned to Apple. This teaches us that failure is not the end but a stepping stone to success. Embracing failures can lead to new insights and opportunities that might not have been visible otherwise.
3. Focus on Simplicity
Jobs was a staunch advocate for simplicity in design and user experience. He believed that products should be easy to use and aesthetically pleasing. This philosophy was reflected in Apple's products, which often stood out for their intuitive interfaces and sleek designs. The lesson here is that simplicity can often lead to greater user satisfaction and success. In a world cluttered with complexity, striving for simplicity can differentiate your work and resonate more with your audience.
4. Innovate Relentlessly
Innovation was at the core of Jobs' vision for Apple. He was not content with just improving existing products; he aimed to revolutionize entire industries. His relentless drive to innovate led to products that transformed the way we interact with technology. This emphasis on innovation encourages us to think outside the box and challenge the status quo. Whether in business or personal projects, always strive to create something new and impactful, rather than simply following trends.
5. Surround Yourself with Talent
Jobs understood that he could not achieve his vision alone. He surrounded himself with talented individuals who shared his passion and commitment to excellence. He fostered a culture of collaboration and creativity within Apple, which contributed to the company's success. This highlights the importance of teamwork and mentorship in any endeavor. Building a strong network of capable and driven individuals can amplify your efforts and lead to remarkable outcomes.
Conclusion
Steve Jobs’ biography is not just a chronicle of his life; it’s a treasure trove of lessons that can inspire anyone striving for greatness. By embracing passion, learning from failures, focusing on simplicity, innovating relentlessly, and surrounding ourselves with talented people, we can forge our paths to success. As we reflect on Jobs’ legacy, let us carry these lessons forward and apply them in our lives, whether in business, personal projects, or any other aspirations we pursue.